Portuguese Custard Tarts (Pasteis De Nata) Recipe
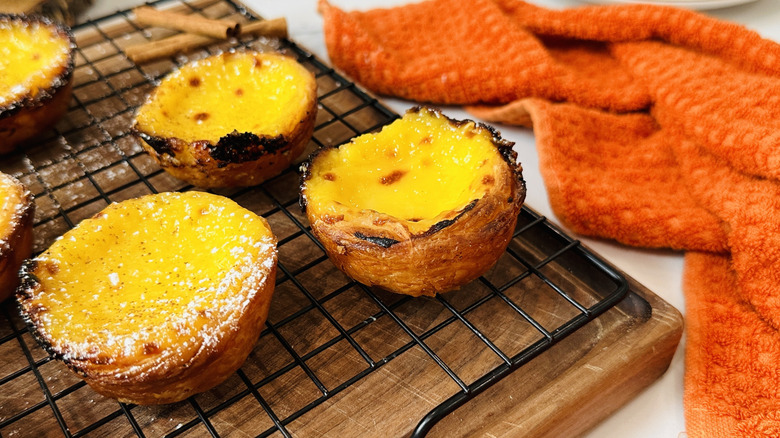
Creamy on the inside and flaky on the outside with just a hint of char, Portuguese custard tarts are an absolute delicacy and a textural delight with every bite. Also known as pastéis de nata, these little tarts look just as good as they taste, making them an excellent dessert option for those occasions when you really want to impress. Though they may look similar to other custard-based pastries around the world, such as Hong Kong egg tarts, Portuguese custard tarts have a flaky puff pastry crust with an irresistible, rich, creamy, and often spiced custard on the inside, making them one of the marvels of the pastry world.
Though you could find these tarts at certain bakeries, you could also whip up a batch of homemade Portuguese custard tarts by following this recipe from developer and pastry chef Katie Rosenhouse — a labor of love no doubt, but one that will pay off in the form of one exceptional dessert. "These tarts are over-the-top delicious," Rosenhouse says. "The crispy pastry shell paired with the rich, custardy filling is an insanely delicious combination." Though this recipe does follow a mostly traditional route for making the tarts (meaning that you will be making your own puff pastry dough), Rosenhouse offers a shortcut method for making the dough, which we'll touch more on down the line.
Gather the ingredients for Portuguese custard tarts (pastéis de nata)
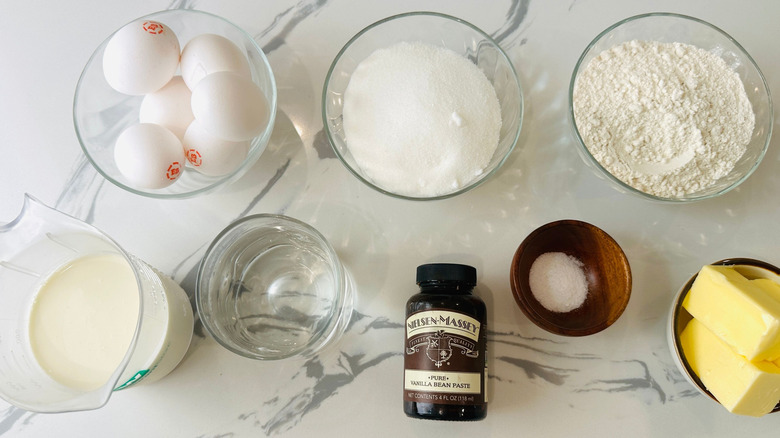
For the pastry portion of the tarts, you'll need all-purpose flour, kosher salt, cold water, and room temperature salted butter. Then, for the custard, you'll want granulated sugar, water, vanilla bean paste or extract, kosher salt, half-and-half (or whole milk), all-purpose flour, and large egg yolks. Optionally, you may wish to add a cinnamon stick and lemon peel to the custard mix, or to garnish the finished tarts with powdered sugar or ground cinnamon.
Step 1: Combine the flour, salt, and water

To prepare the pastry, in a medium bowl, stir (or use your fingertips) to combine the flour, salt, and ½ cup water until the dough looks shaggy.
Step 2: Knead the dough, then allow it to rest
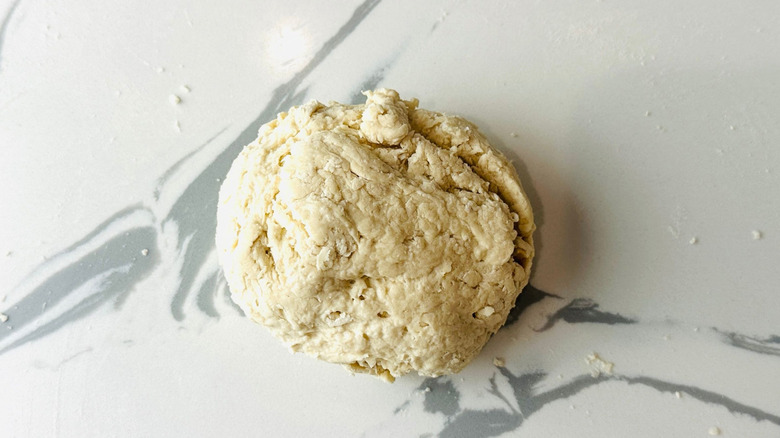
Transfer the dough to a clean countertop and lightly knead it to combine, adding remaining water as needed just until the dough comes together. Wrap the dough with plastic wrap and let it rest at room temperature for about 15 minutes.
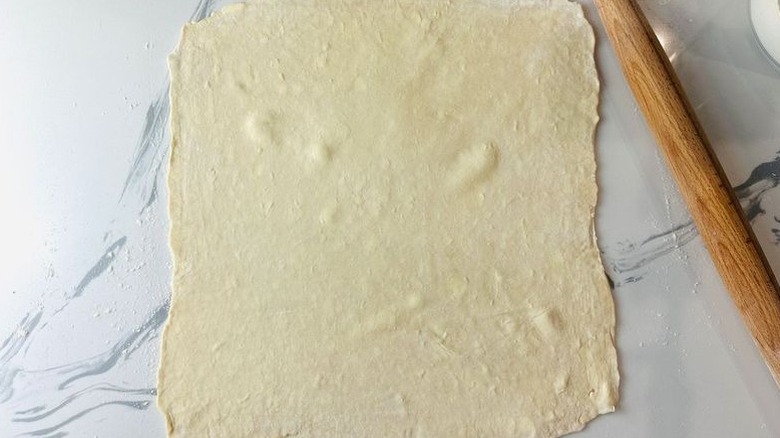
Step 3: Roll out the dough
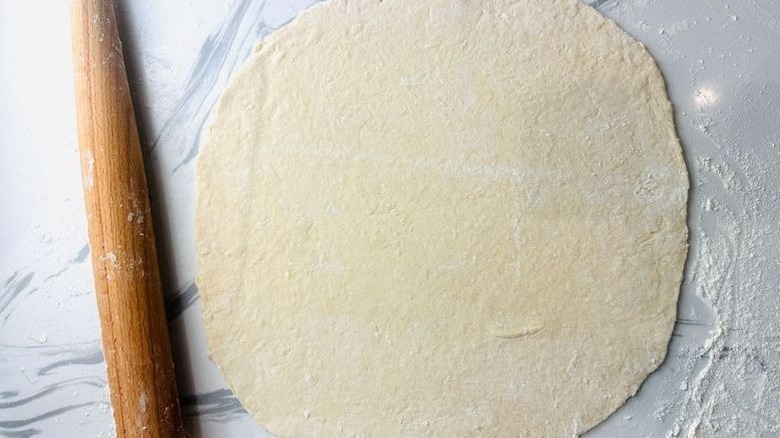
Flour your surface and roll the rested dough to a 16- to 18-inch square.
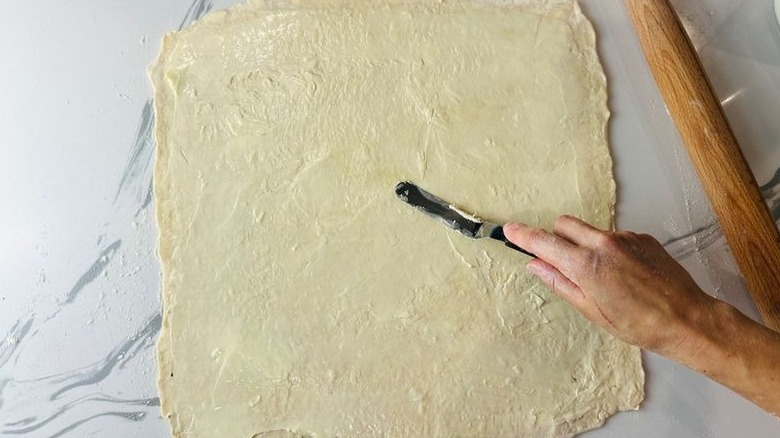
Step 4: Coat the dough in butter
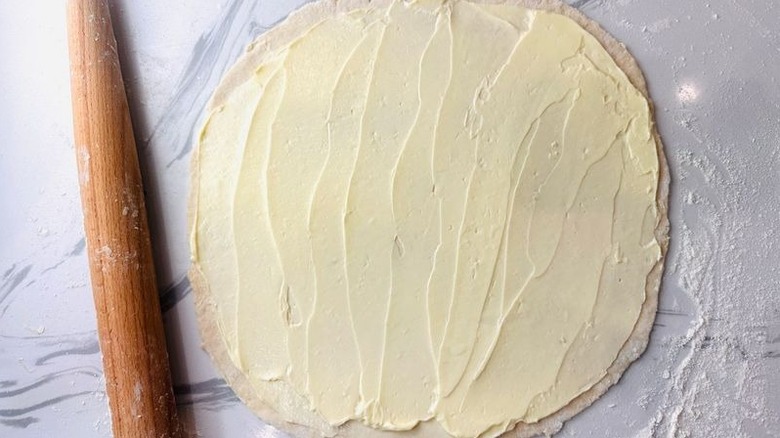
Spread to coat the dough evenly with ½ cup butter, leaving a small border along the edges.
Step 5: Cut slits in the dough
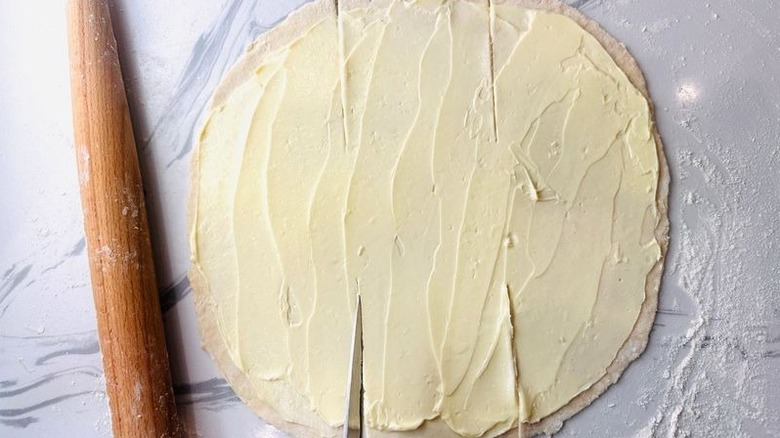
Cut slits in the square in thirds on the top and bottom, leaving the center ⅓ uncut.
Step 6: Begin folding one section of dough
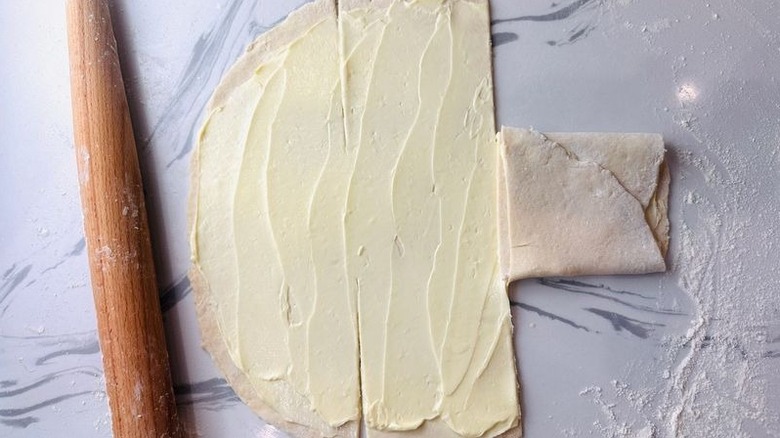
Starting on the right, fold the top and bottom portions of the dough over the center.
Step 7: Continue folding the dough
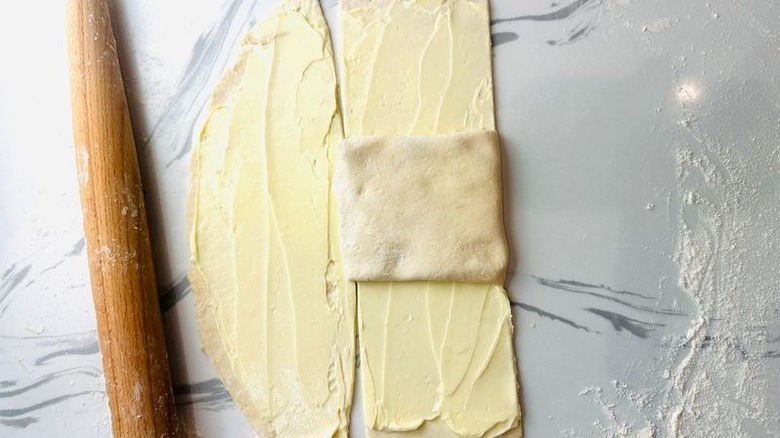
Flip the right side square of dough over the center square. Fold over the top and bottom sections.
Step 8: Repeat with the left side
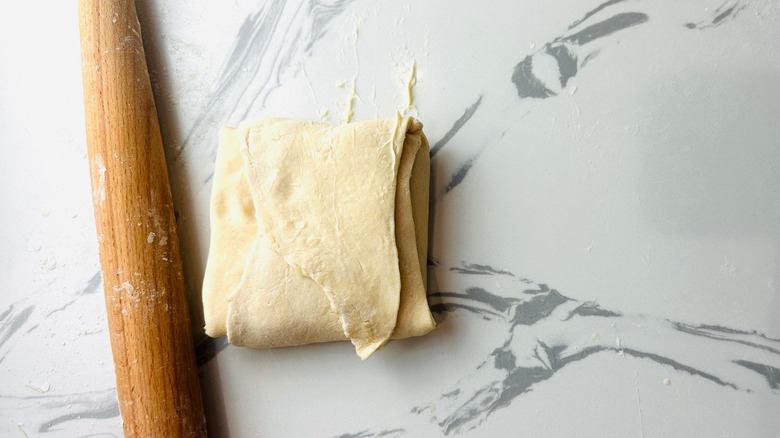
Repeat one final time with the remaining left side of the square.
Step 9: Wrap and chill the dough
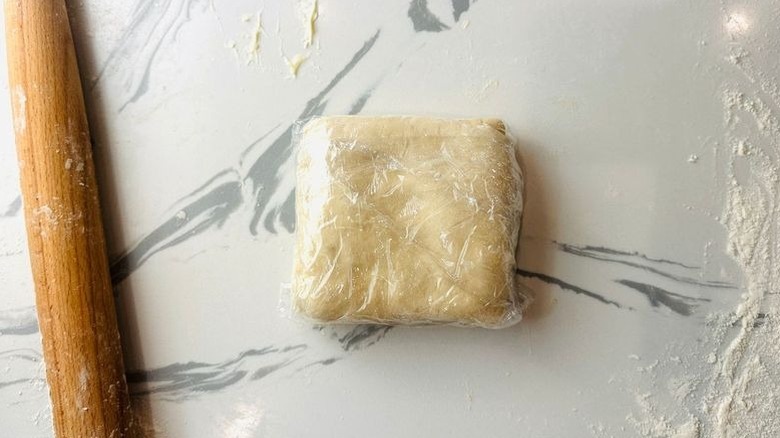
Wrap the dough gently with plastic wrap and chill for at least 1 hour or overnight.
Step 10: Begin the sugar syrup for the custard
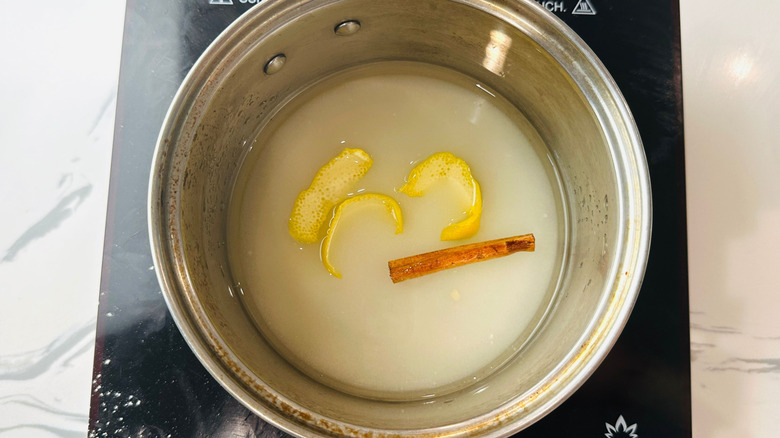
In the meantime, to prepare the sugar syrup, stir to combine the sugar, water, vanilla, salt, and cinnamon stick and lemon peel if you're using, in a small pot.
Step 11: Boil the sugar mixture
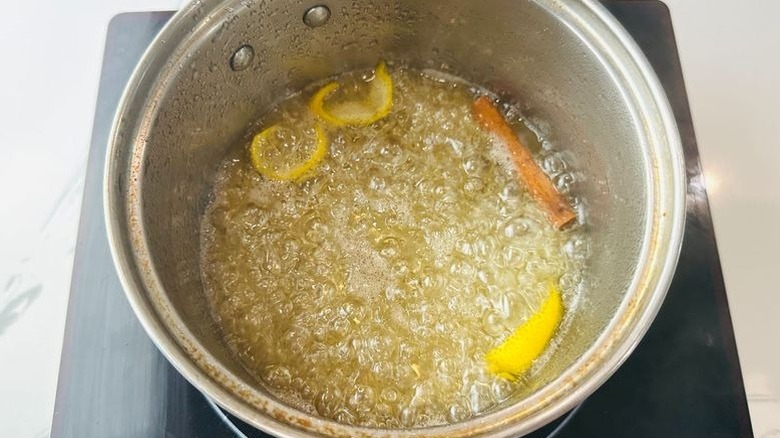
Bring to a boil, and continue to boil over medium heat for 1 minute.
Step 12: Remove the syrup from the heat
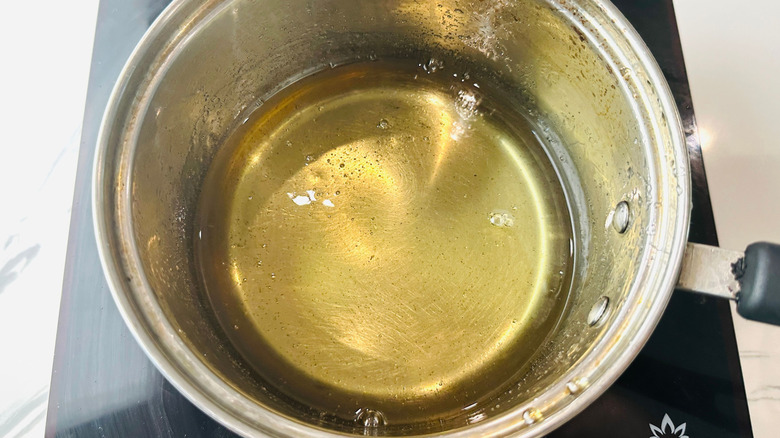
Remove the pot from the heat. Discard the cinnamon stick and lemon peel if needed.
Step 13: Heat the milk and flour, then whisk in the sugar syrup
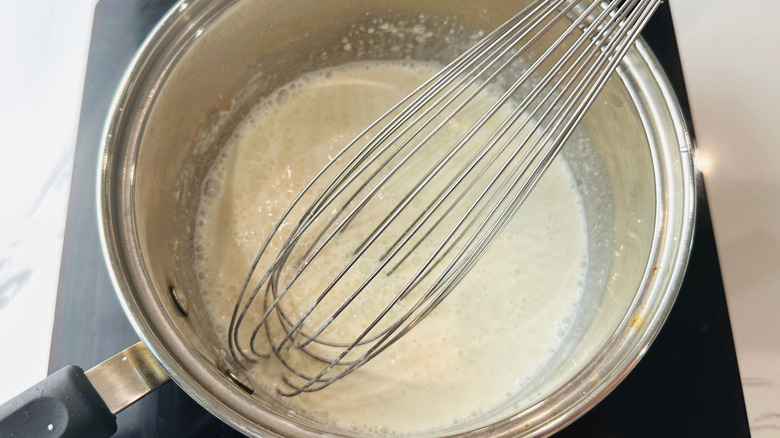
In another small pot, whisk the milk and flour to combine, and cook, whisking, until the mixture is scalding. Slowly whisk in the sugar syrup to combine. Remove from the heat.
Step 14: Whisk the egg yolks
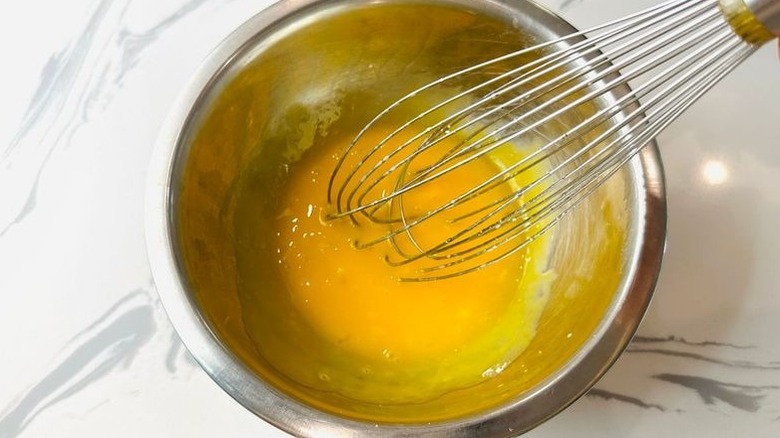
Whisk the egg yolks in a medium bowl until smooth.
Step 15: Whisk half of the milk mixture into the egg yolks
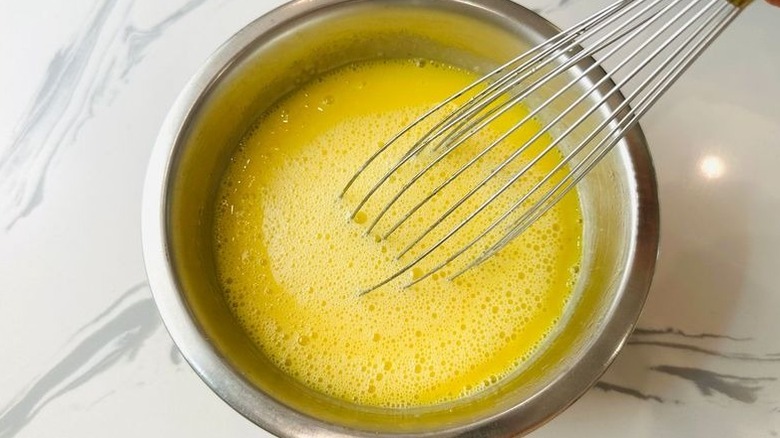
Slowly whisk about half of the hot milk mixture into the egg yolks.
Step 16: Cook the custard until thickened
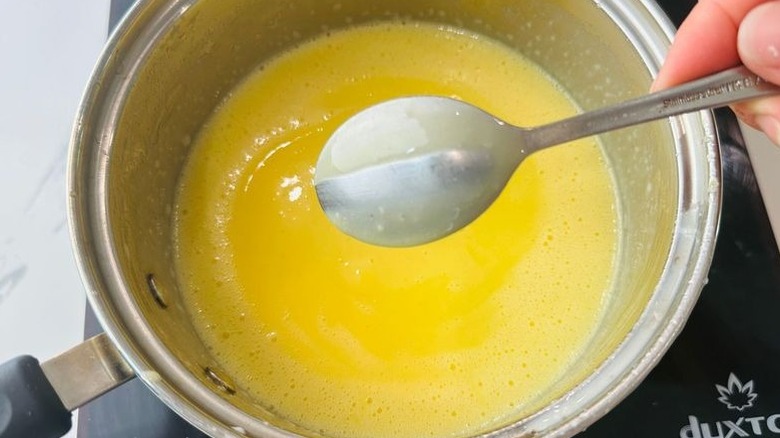
Return the mixture to the pot and cook over low heat, whisking constantly, until thickened enough to just coat the back of a spoon. Avoid overcooking, which could cause it to curdle.
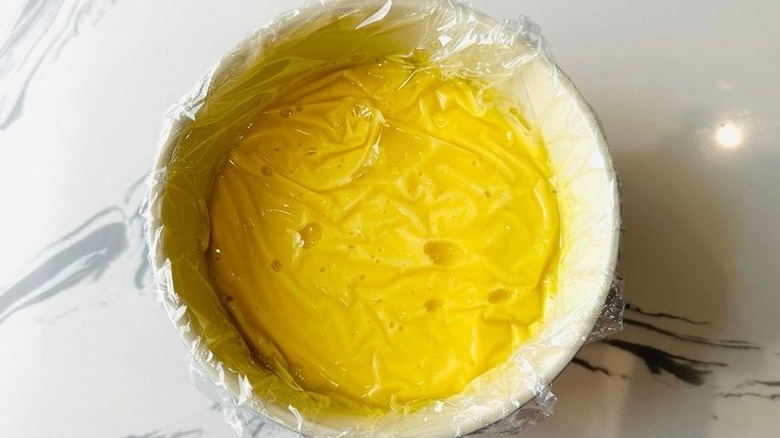
Step 17: Strain, cover, and chill the custard
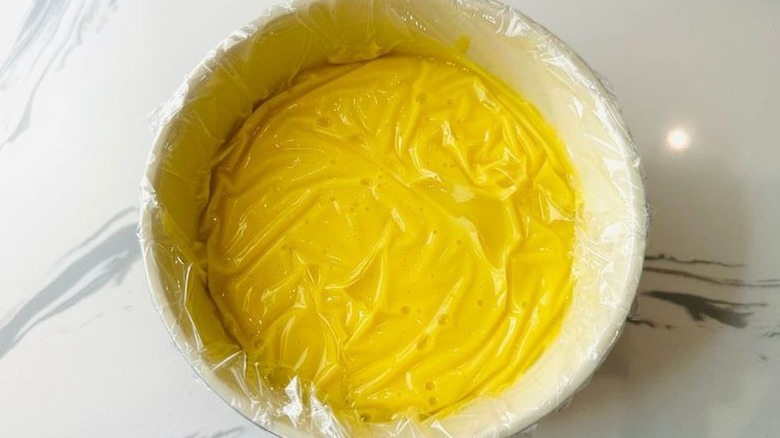
Strain the custard into a bowl and place plastic wrap directly on the surface. Chill until ready to use (or for up to two days).
Step 18: Roll out the chilled dough
Once the dough has chilled, transfer it back to a floured surface and roll to a 16x20-inch rectangle.
Step 19: Coat the dough with remaining butter
Spread to coat the dough with the remaining ¼ cup butter, leaving a small border along the edges.
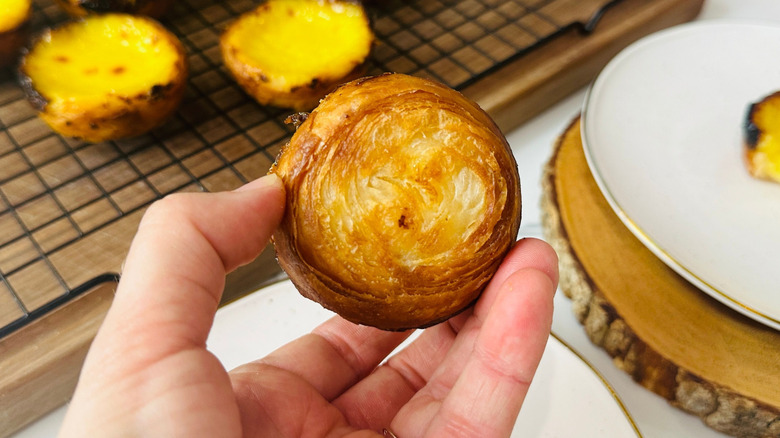
Step 20: Roll the dough into a log
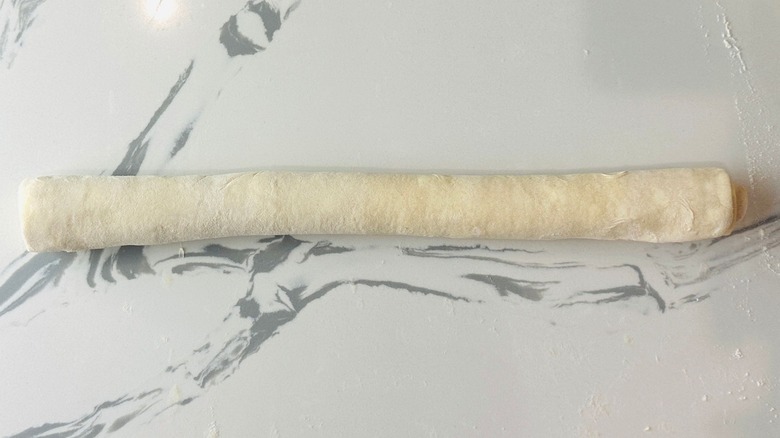
Trim the edges and roll tightly starting on one of the short ends to form a log.
Step 21: Pinch the seams to seal the log
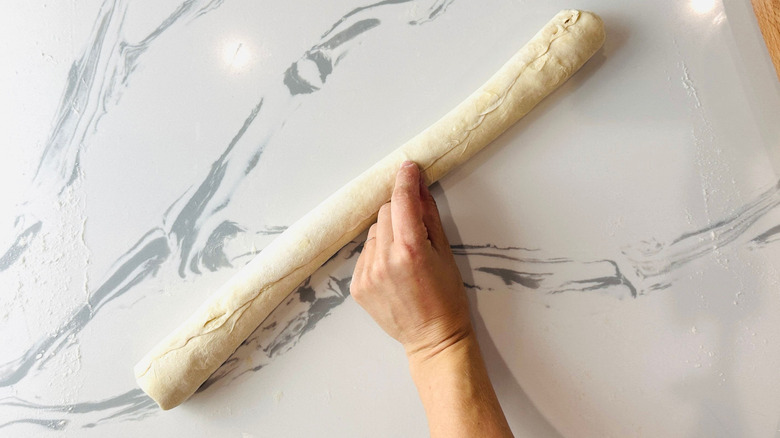
Pinch the seams to seal the log.
Step 22: Cut the dough log in half, then refrigerate
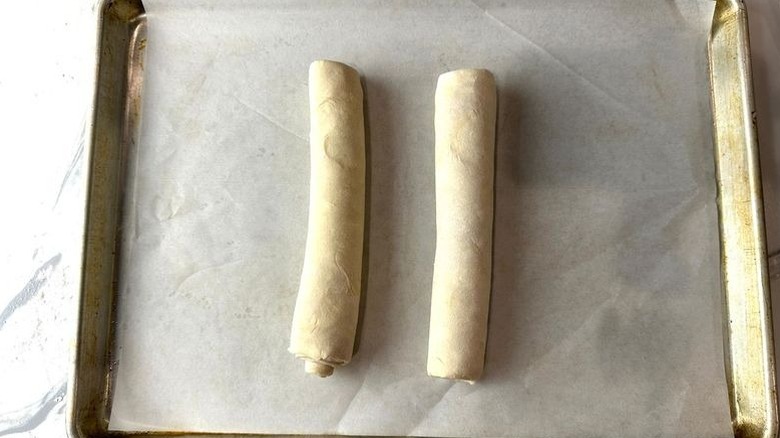
Cut the log in half, then refrigerate until cold (about 30 minutes to 1 hour).
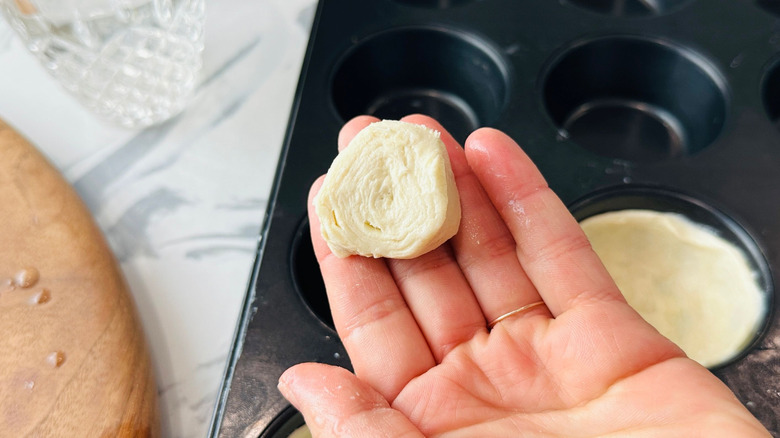
Step 23: Slice the dough logs into smaller pieces
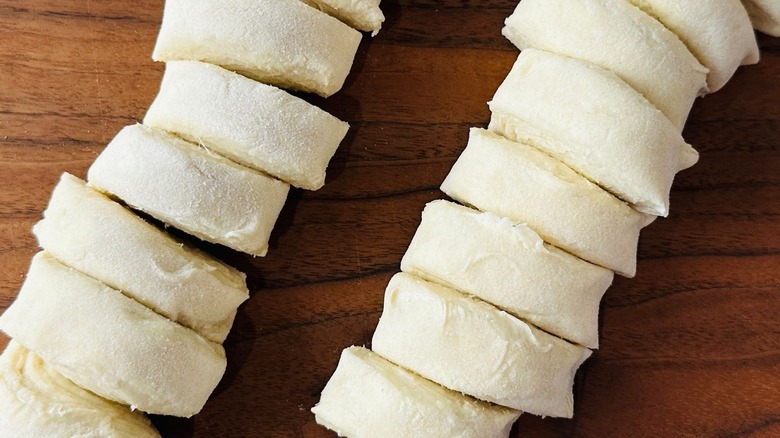
Trim the ends, then use a sharp knife to cut each log into 8 to 9 slices.
Step 24: Preheat the oven

Preheat the oven to 550 F.
Step 25: Bring the custard to room temperature
Stir and let the custard filling stand, covered, at room temperature.
Step 26: Set out muffin tins
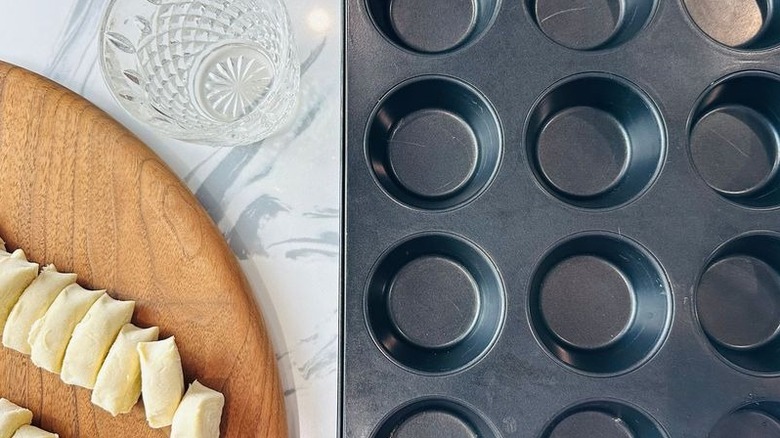
Grab two standard muffin pans and a small cup of cold water.
Step 27: Add the dough to the muffin tin
Wet your fingers, then press one section of dough into each well of the muffin pan, working it up the sides until the dough is evenly thin and coats the muffin well about ¾ of the way up. Avoid sealing the top edges of the dough as you work.
Step 28: Repeat with all of the dough
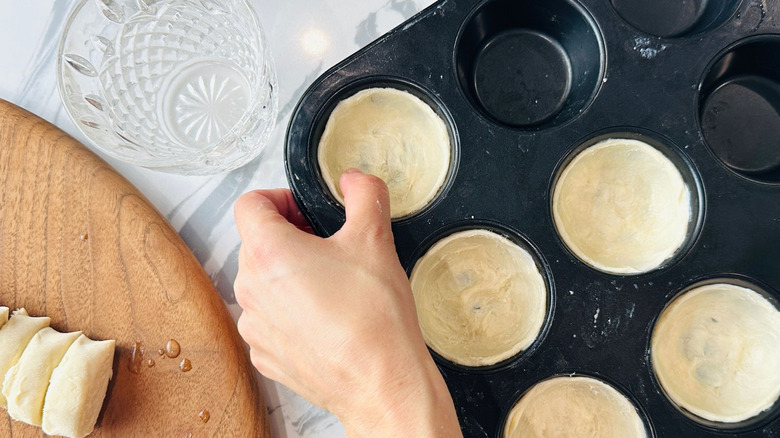
Repeat with the remaining dough sections, discarding any excess dough, to form 16 tarts.
Step 29: Scoop custard into the dough cups
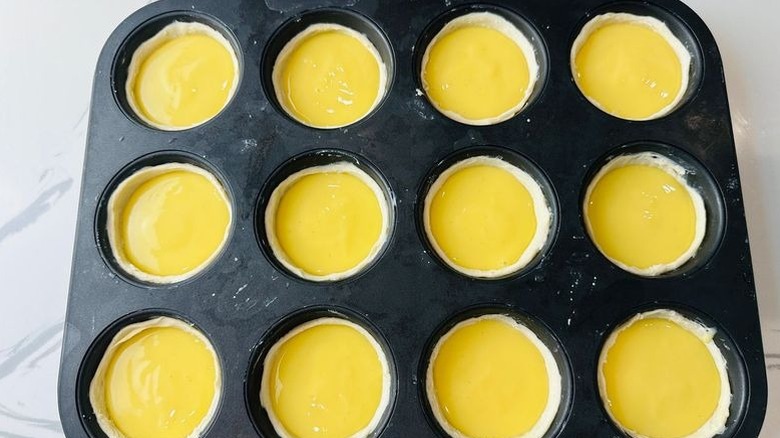
Use a small scoop to portion the custard into each well, filling them about ¾ of the way to the top of the dough.
Step 30: Bake the tarts one pan at a time
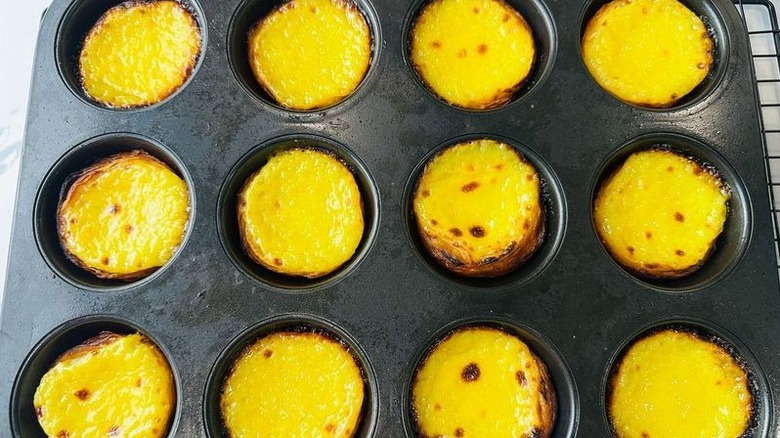
Bake one pan at a time (chilling the remaining pan in the refrigerator until ready to bake) for 10-12 minutes, keeping an eye on them using an oven light if possible, until the edges are golden and crisp, the center jiggles slightly, and the top has browned in spots.
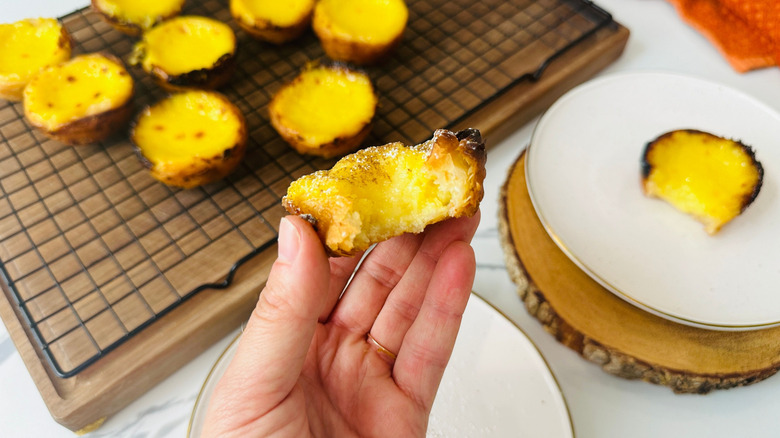
Step 31: Cool and unmold the tarts
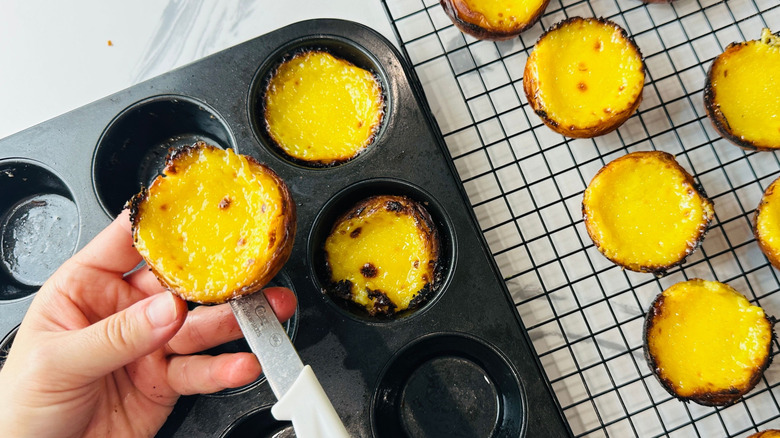
Let the pan rest on a wire rack for 5 minutes before using a small paring knife to unmold the tarts onto wire rack (they'll be intensely hot).
Step 32: Repeat with the other pan of tarts
Repeat with the remaining pan.
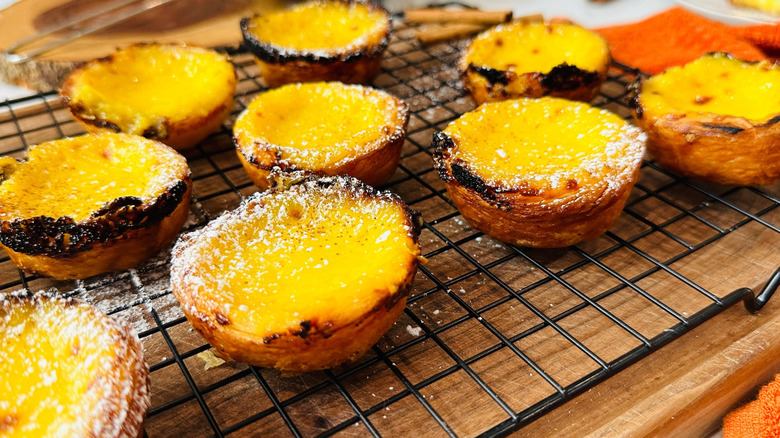
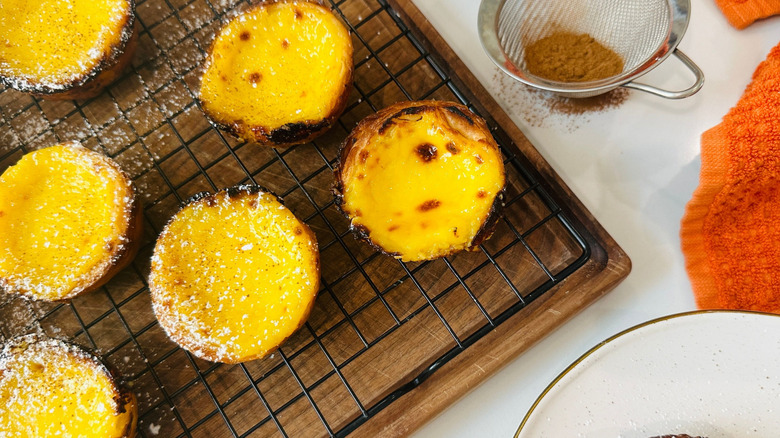
Step 33: Optionally dust the tarts with powdered sugar and cinnamon before serving
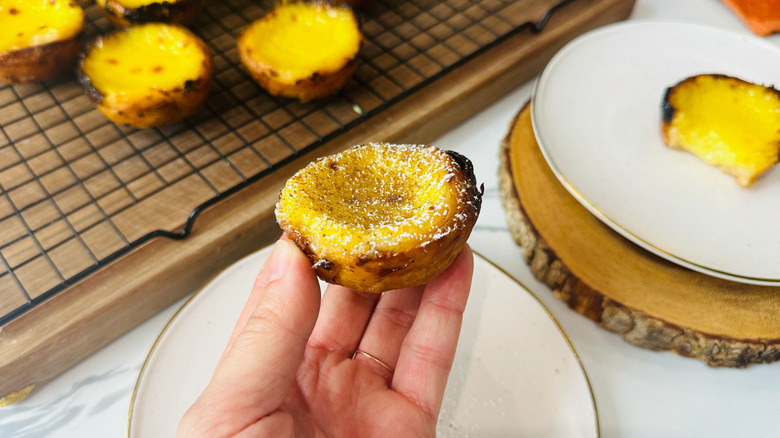
Serve warm, dusting the tarts with powdered sugar and cinnamon, if desired.
What pairs well with Portuguese custard pies?
Portuguese Custard Tarts (Pasteis de Nata) Recipe
Creamy on the inside and flaky on the outside with just a hint of char, Portuguese custard tarts are an absolute delicacy and a marvel of the pastry world.
Ingredients
- For the pastry
- 1 ½ cups all-purpose flour, plus additional for rolling
- ¼ teaspoon kosher salt
- ⅔ cup cold water, divided
- ¾ cup salted butter, at room temperature, divided
- For the custard
- 1 ¼ cups granulated sugar
- ⅔ cup water
- 1 teaspoon vanilla bean paste or extract
- ¼ teaspoon kosher salt
- 1 ¼ cups half-and-half or whole milk
- 2 tablespoons all-purpose flour
- 6 large egg yolks
Optional Ingredients
- Cinnamon stick
- Lemon peel
- Confectioners' sugar and ground cinnamon, for dusting
Directions
- To prepare the pastry, in a medium bowl, stir (or use your fingertips) to combine the flour, salt, and ½ cup water until the dough looks shaggy.
- Transfer the dough to a clean countertop and lightly knead it to combine, adding remaining water as needed just until the dough comes together. Wrap the dough with plastic wrap and let it rest at room temperature for about 15 minutes.
- Flour your surface and roll the rested dough to a 16- to 18-inch square.
- Spread to coat the dough evenly with ½ cup butter, leaving a small border along the edges.
- Cut slits in the square in thirds on the top and bottom, leaving the center ⅓ uncut.
- Starting on the right, fold the top and bottom portions of the dough over the center.
- Flip the right side square of dough over the center square. Fold over the top and bottom sections.
- Repeat one final time with the remaining left side of the square.
- Wrap the dough gently with plastic wrap and chill for at least 1 hour or overnight.
- In the meantime, to prepare the sugar syrup, stir to combine the sugar, water, vanilla, salt, and cinnamon stick and lemon peel if you're using, in a small pot.
- Bring to a boil, and continue to boil over medium heat for 1 minute.
- Remove the pot from the heat. Discard the cinnamon stick and lemon peel if needed.
- In another small pot, whisk the milk and flour to combine, and cook, whisking, until the mixture is scalding. Slowly whisk in the sugar syrup to combine. Remove from the heat.
- Whisk the egg yolks in a medium bowl until smooth.
- Slowly whisk about half of the hot milk mixture into the egg yolks.
- Return the mixture to the pot and cook over low heat, whisking constantly, until thickened enough to just coat the back of a spoon. Avoid overcooking, which could cause it to curdle.
- Strain the custard into a bowl and place plastic wrap directly on the surface. Chill until ready to use (or for up to two days).
- Once the dough has chilled, transfer it back to a floured surface and roll to a 16x20-inch rectangle.
- Spread to coat the dough with the remaining ¼ cup butter, leaving a small border along the edges.
- Trim the edges and roll tightly starting on one of the short ends to form a log.
- Pinch the seams to seal the log.
- Cut the log in half, then refrigerate until cold (about 30 minutes to 1 hour).
- Trim the ends, then use a sharp knife to cut each log into 8 to 9 slices.
- Preheat the oven to 550 F.
- Stir and let the custard filling stand, covered, at room temperature.
- Grab two standard muffin pans and a small cup of cold water.
- Wet your fingers, then press one section of dough into each well of the muffin pan, working it up the sides until the dough is evenly thin and coats the muffin well about ¾ of the way up. Avoid sealing the top edges of the dough as you work.
- Repeat with the remaining dough sections, discarding any excess dough, to form 16 tarts.
- Use a small scoop to portion the custard into each well, filling them about ¾ of the way to the top of the dough.
- Bake one pan at a time (chilling the remaining pan in the refrigerator until ready to bake) for 10-12 minutes, keeping an eye on them using an oven light if possible, until the edges are golden and crisp, the center jiggles slightly, and the top has browned in spots.
- Let the pan rest on a wire rack for 5 minutes before using a small paring knife to unmold the tarts onto wire rack (they'll be intensely hot).
- Repeat with the remaining pan.
- Serve warm, dusting the tarts with powdered sugar and cinnamon, if desired.
Nutrition
| Calories per Serving | 229 |
| Total Fat | 12.6 g |
| Saturated Fat | 7.4 g |
| Trans Fat | 0.4 g |
| Cholesterol | 98.3 mg |
| Total Carbohydrates | 26.5 g |
| Dietary Fiber | 0.4 g |
| Total Sugars | 16.5 g |
| Sodium | 156.4 mg |
| Protein | 3.0 g |
What are tips for making perfect Portuguese custard tarts?
A glimpse at this recipe proves that it's a pretty involved one, but Rosenhouse assures us that "reading through the recipe and measuring out your ingredients ahead of time goes a long way in easing the process." She has also provided some helpful baking tips to ensure that your tarts — both pastry and custard — turn out perfectly every time. To break up the labor-intensive steps, you could prepare the pastry a day in advance, then pick up the recipe the next day, starting with making the custard. Take care not to overcook the custard, or it might curdle. Cook until the custard has thickened enough to coat the back of a spoon, then remove from heat right away.
Another tip for making perfect tarts is to have plenty of patience, especially during the more tedious parts of the process. "Patience when pressing the dough into the muffin pans is key — you'll want to keep it as even as possible," Rosenhouse advises. "Make sure to wet your fingers to keep the dough from sticking."
Consider opening your windows or turning on a fan when baking the tarts (since they bake at such a high heat), and be careful not to overbake them. "Bake just until the tarts are golden brown along the edges and still slightly jiggly in the center," Rosenhouse says. "They'll continue to set up to the perfect creamy consistency as they cool." Finally, enjoy the fruits of your labor while they're still warm; though the tarts do taste good cold or at room temp, they're exceptional while warm.
What makes this shortcut laminated dough different from regular laminated dough?
To understand exactly what makes the laminated dough in this recipe a "shortcut," it's important to understand the process behind traditional or non-shortcut laminated dough. "Typically when making laminated dough, you'll complete around 3 'turns' — rolling, folding, and chilling the dough with each round," Rosenhouse explains. This process yields wonderfully flaky, layered pastry, similar to the those beautifully flaky layers in classic croissants. The only downside is that it's a labor-intensive process, and one that takes quite a bit of time between actually folding the dough and chilling it between each session.
In this recipe, Rosenhouse simplifies the process a little bit while still ensuring that the pastry turns out nice and flaky. "Here we tightened up the process to a single step by including multiple folds in the single laminating step," she explains. She strongly advises following the photos in the recipe as closely as possible to ensure that your dough is folded an adequate amount of times. And, as a final laminating tip, Rosenhouse tells us to avoid overworking the dough and to give it plenty of time to rest when resting is called for. "Chill thoroughly before rolling out the dough to make sure the butter and dough layers have chilled sufficiently to create a super flaky pastry."