Common Mistakes Everyone Makes When Baking Pavlova
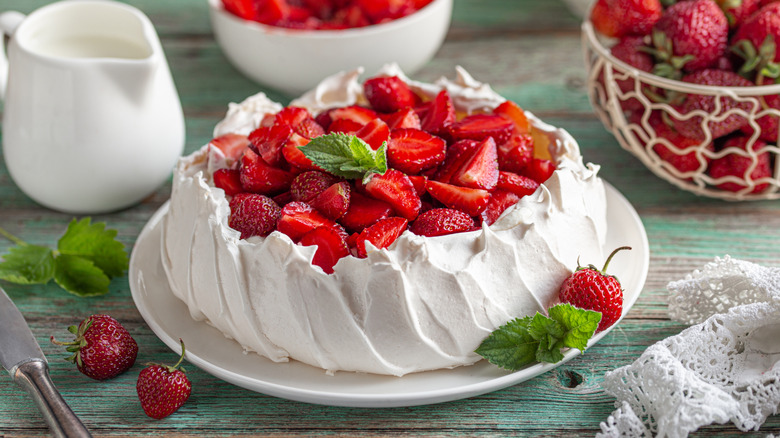
A pavlova is a dessert comprised of a baked meringue topped with whipped cream and fruit. Crisp and cloudlike, it's an impressive alternative when you desire something lighter than cake and more elegant than cookies or brownies to present at the end of a meal.
Pavlova's origin story is complicated, with Australia and New Zealand leading the main feud on its creation. Both nations assert that they invented it as an ode to ballerina Anna Pavlova while she was on tour in both locations during the 1920s. It is commonly believed that the voluminous tutus she would wear during her performances inspired the pavlova's fluffy design.
While you don't need to master a perfect plié or pirouette (though I won't stop you if you want to try, just not in the kitchen near any knives), you do need to know how to make a meringue. And that can be just as terrifying as any complicated ballet move. A dessert involving homemade meringue will be riddled with potential fatal flaws. On top of that, you're also dealing with a double whammy of figuring out the whipped cream and the fruit topping.
Don't revert to your usual lineup of tried-and-true desserts if you're feeling a little timid to step outside of your comfort zone. Allow me to be your guiding light through the murky madness of meringues. I have the goods to prove to you I'm your gal! Meringues and pavlovas have been on menus in different restaurants where I have been employed as a pastry cook, and I enjoy making them from time to time at home when we have company over for dinner. Continue reading for my list of common pavlova mistakes, and how you can avoid them with ease and confidence in your own kitchen.
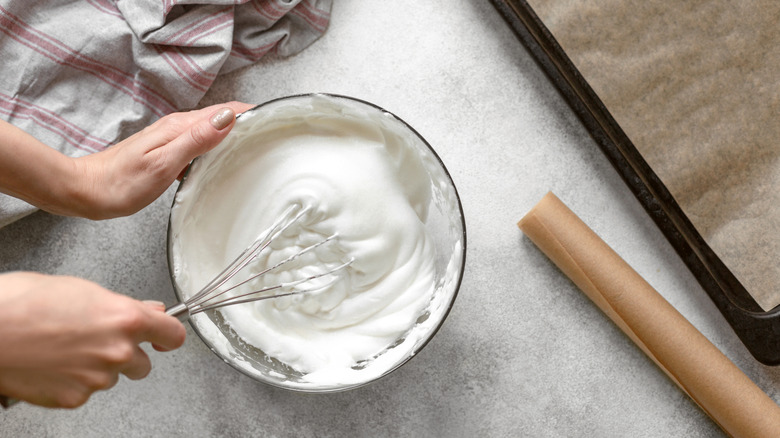
Forgetting to study meringue basics
Making meringues from scratch can be finicky, annoying, frustrating, and tricky ... but with just one bite of that delicate crunch into those melt-in-your-mouth clouds, all is forgiven. You are immediately rewarded with a delightful experience that erases any complaints or expletive language you may or may not have been muttering under your breath.
A perfectly executed homemade meringue is not an easy achievement, and there's a never-ending rulebook to follow to ensure that they are made and baked properly for the most ideal results in a not-so-ideal reality of an imperfect world with a hoard of potential issues to face. From the different styles of meringue, to correct mixing procedures, to the size of the sugar granules used, to the weight of the eggs, to optimal outdoor weather, you have a lot to review prior to picking up a measuring cup. So it's best to be armed with as much knowledge as possible, either from personal experience or from other bakers' recorded successes, failures, tips, and tricks.
Already overwhelmed? Soak in the knowledge little by little before stepping into the kitchen. I highly suggest my guide to the most common mistakes when baking meringues, as this will give you some clear advice on exactly what not to do regarding meringue basics and how to have the most successful bakes.
Thinking you can make it quickly
A pavlova is not a last-minute dessert option to make if you need a sweet treat fast. Not only does a meringue base need at least an hour to bake in the oven, it also needs an additional hour or two to completely cool and set in the oven. Mark my words: a baked meringue is not something you can rush.
You also need to coordinate baking the meringue with preparing all of the other pavlova components, like making the whipped cream and fruit topping. Sure, it's quick enough to whisk cream and wash and dry produce, but there are additional prep steps you may not have fully considered that will take extra time to complete. Have you thought about the time necessary for fully chilling your stand mixer bowl and whisk attachment prior to whipping the cream? Are you making a homemade compote or sauce that needs to cook, cool, and thicken completely before decorating? Be sure to review all of your recipes prior to committing to a rushed date for serving, as you might uncover some unexpected preparation requirements.
Leaving out key ingredients
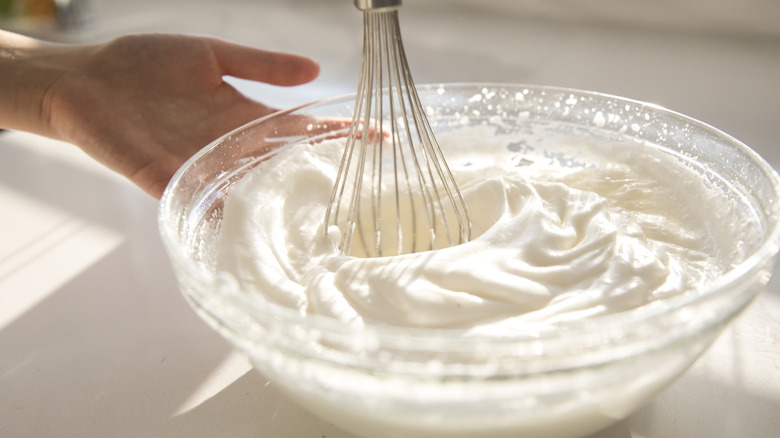
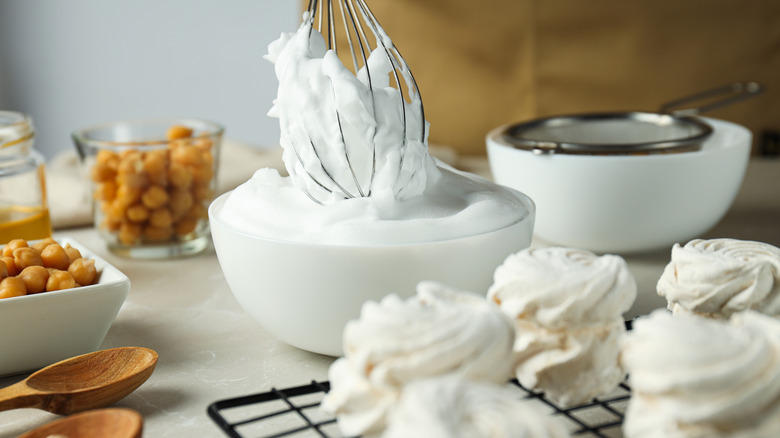
At its most basic, a meringue is a whipped foam composed of aerated egg whites. From there, other ingredients can be introduced to the mix to offer both flavor and stability. Fine granulated sugar helps to strengthen the foam's structure while simultaneously offering sweetness. When baked, the meringue turns into a dry treat with a uniformly light and crisp texture.
For the meringue used in a pavlova dessert, there's often more personality to it than a basic baked meringue cookie. It should have distinct layers of textural differences: the outside is light and crisp, while the interior is tender and chewy yet still very delicate, similar to a marshmallow. While you could easily use a crispy meringue cookie as the base in a pinch, you'll be missing out on the unique character of a meringue intended for a pavlova.
In order to attain these varying textures, two important ingredients are added to the meringue to further manipulate its structure. If you are intrigued, seek out baked meringue recipes that include both cornstarch and acid in the form of lemon, vinegar, or cream of tartar.
Using the wrong sheet pan liner
You could have the most perfectly executed meringue base that has ever been created in the entirety of pastry history. And it could be annihilated with zero mercy if you make one critical baking error: not prepping your sheet pan correctly. There are different styles of sheet pan liners that each have their specific merits, but they all have serious flaws when you use them for baking meringues. Avert your eyes from aluminum foil, wave away wax paper, condemn cooking spray, and say no to silicone. All of these liner options are hardcore no-no's when it comes to baking any kind of delicate meringue dessert. Aluminum foil conducts too much heat, which can cause the bottom of your meringue to brown too quickly. And the slick film on wax paper and residual greasiness from silicone mats and cooking sprays lead to excessive spreading and uneven baking.
So, then, what's the best choice of liner for baking meringue? Parchment paper, forever and always. With its light material, nonstick qualities, and heat resistance, a single sheet of ungreased parchment paper remains my top choice to prep my sheet pans.
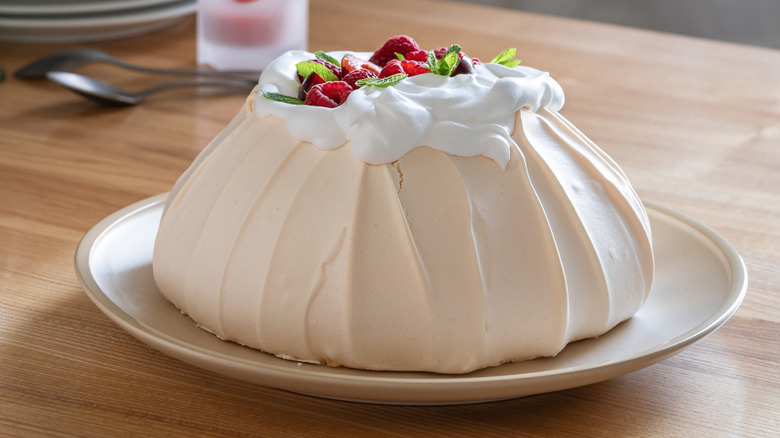
Being sloppy with shaping
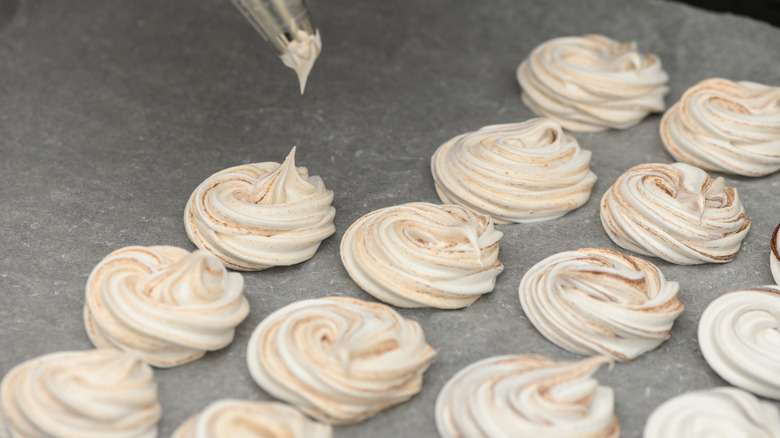
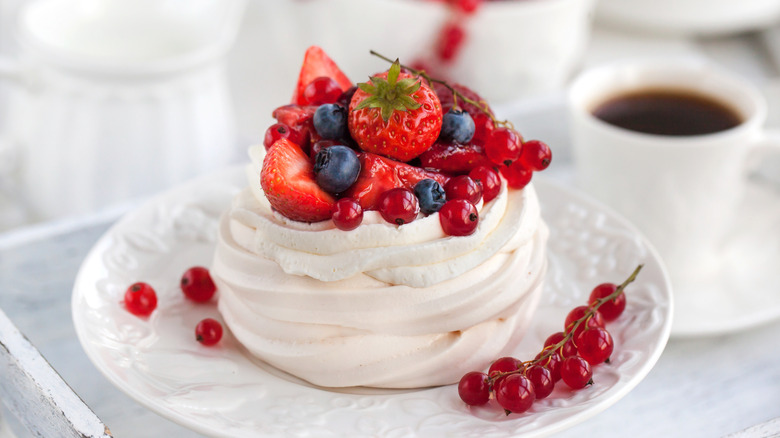
The final shape of your meringue determines how evenly it will bake in the oven, an important point to consider if you want a perfect pavlova with the best textural contrast between the crisp exterior and the chewier interior. To achieve that, the meringue should not be spread too thinly on the sheet pan, and it should ideally be at least 1-inch tall. Typically, pavlovas are shaped in an even circle, but very few of us are gifted with being able to draft a perfectly round shape solely by hand. One of my favorite pastry cheats is to trace a circle on the opposite side of the parchment paper using an object as a neat stencil that has the same circumference of how big I want my meringue to be. This is usually either a bowl or cake pan for a larger pavlova, and cookie cutters for smaller individual pavlovas.
To ease the difficulty of spreading the meringue by hand, be sure you are using the right kind of tools. An offset spatula is among the many smart restaurant hacks for a neat and clean application. For the most control, especially when you want to make multiple meringue discs that all have a uniform appearance, I use a piping bag fitted with a large round or star tip.
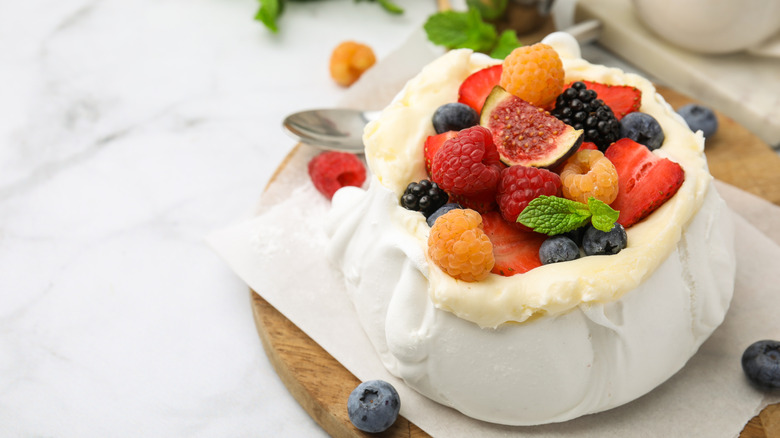
Another shaping trick for a pavlova is forming an indentation in the center of the disc to create a "nest." This cute nook offers a neat little home for the whipped cream and fruit, a shallow reservoir to prevent them from spilling out too much.
Not paying attention to oven temperature and time
For the best results with minimal risk of either weeping or cracking, the oven temperature and amount of time baking are crucial proponents to control. As a general rule for virtually all styles of baked meringues, pavlovas need to be baked at a lower oven temperature for a longer period of time. Treat the pavlova as the delicate queen she is by gently coaxing out moisture and gradually drying out the wet meringue base. I stay within the range of 200 to 250 degrees Fahrenheit when baking meringues, and always take the extra precautionary measure of using an oven thermometer to check that my oven is behaving accordingly.
As for the bake time, that fluctuates depending on the size of your pavlova. A large mound may take between one to two hours active baking time, while smaller individual units may take a shorter amount of active time. As mentioned before, the babysitting doesn't stop there. After the active bake time and when the oven is turned off, meringues need to slowly cool while still in the oven to fully set their exterior and interior structures. You can look ... but you can't touch!
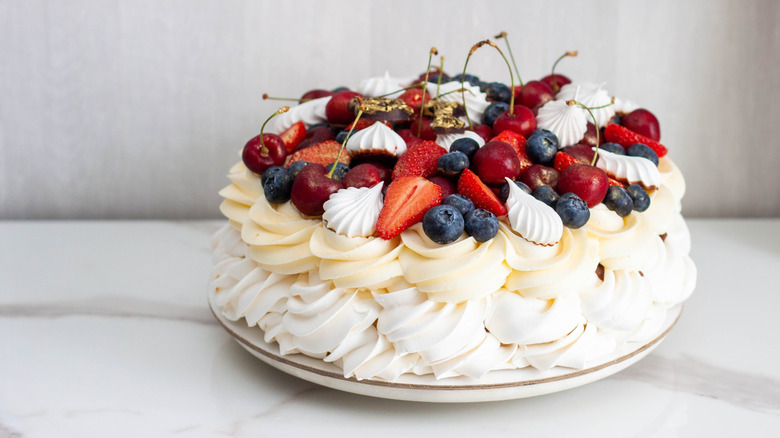
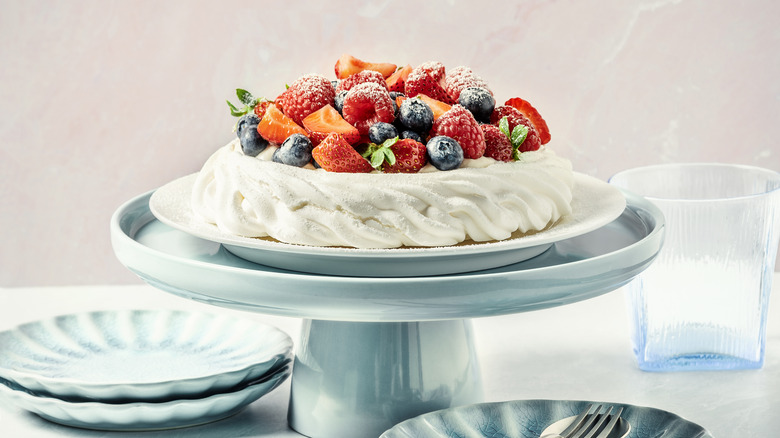
Disregarding the toppings
You worked so hard to make a perfect homemade meringue, so don't be stingy on quality when it comes to the other components of your pavlova. Both the whipped cream and the fruit topping should be treated just as thoughtfully as the meringue base itself.
With so many options to consider for bold flavor combinations, I never like settling for a tub of premade whipped cream or canned/jarred fruits. Make your own whipped cream, a quick and easy task to do by whisking heavy whipping cream until soft and slightly under-whipped peaks form. It's a heavenly end result achieved right at home that's worthy of any bakery display case or restaurant dessert plate.
Get your creative juices flowing with the versatility of the fruit topping. Let seasonality do the talking by garnishing with an assortment of beautifully ripe fresh fruit, anything from bursting berries to slices of tropical goodies to pretty pommes. Or you can go a few prep steps beyond just using fresh and raw sliced fruit by cooking up something fun in the kitchen. Homemade jams, jellies, or preserves or a rich compote would add a concentrated component of sweetness to the dessert. For a spark of brightness, try a zingy curd made from scratch. Lemon curd is a classic choice that's easy to make, especially when there's a version you can prep in your microwave, but you can also make a zesty sauce with other citrus fruits like lime, orange, or grapefruit.
Rushing the final assembly
While significantly easier than building and decorating a multitiered cake, you still need to have an organized strategy for how you are planning to assemble your pavlova. Some attention is required here for a simple, yet breathtaking, outcome without your dessert looking like slapdash heaps of stuff piled on top of each other.
First, carefully place the meringue on the serving platter to avoid breaking. Then, gently dollop or spread the whipped cream on top of the meringue to prevent it from deflating. For a cleaner presentation, leave about a ½-inch border around the meringue so that the whipped cream doesn't start drifting down the sides. Lastly, place your chosen fruit topping on top of the whipped cream with agile confidence. Second-guessing the fruit's assembly or using too heavy of a hand will cause any saucy liquid from the fruit to blend excessively with the whipped cream, merging the two together and spoiling the intent of clean, separate layers.
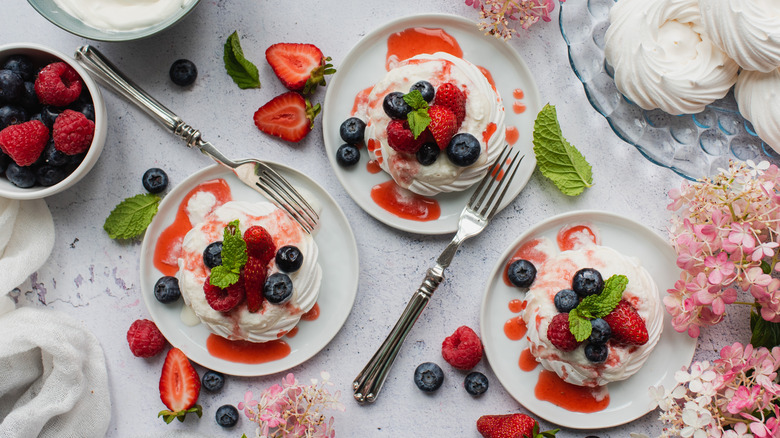
Even more care should be adopted for smaller formats of a pavlova with a composed dessert plating style. Use a piping bag for the whipped cream, a small spoon for any sauce, and tongs for other garnishes to achieve exacting precision with each component's placement. If there was ever a time to be obsessively meticulous in the kitchen, now is it. Polish those kitchen tweezers with pride and get your piping tips in order.
Not serving or storing correctly
A crisp meringue and a wet topping won't stay the best of friends for long ... they turn into fighting foes soon enough. Layering the meringue with the toppings too far in advance will inevitably lead to a soggy mess if not served immediately. When directly in contact with either the whipped cream or the fruit topping, the airy meringue will basically mimic a sponge and absorb their moisture at a fast rate, quickly softening its structure. If you want to enjoy the playful textural variations of a pavlova, be prepared to assemble as soon as you are ready to serve the dessert to your guests.
With that said, there are measures you can take in order to prep and store each component in advance if you want to plan ahead of time. Once your meringue base is baked and completely cooled, you can store it in an airtight container in a cool, dry room like a pantry or cabinet for up to one week. To optimize this storage technique, make sure it is placed away from heat sources or sunlight. I prefer to whip heavy cream as fresh as possible for a special last-minute touch, but for better time management, make your whipped cream last longer by stabilizing it with powdered sugar, marshmallow fluff, or an instant pudding mix. As for the fruit, fresh fruit or any sauces and compotes can be stored separately in the refrigerator until you are ready to use them.
Believing you can't make it vegan
Made without any wheat ingredients, a pavlova is already a special dessert option for those following a gluten-free diet. But with all the eggs and cream, how could it ever be a vegan treat? With a crafty approach to a few alternative ingredients, it's easier than you think to totally transform this light-as-air dessert into a dairy-free delight with no animal products whatsoever.
For the meringue base, minimize food waste while simultaneously delighting vegan dietary restrictions by using aquafaba, the leftover viscous liquid from a can of garbanzo beans. Aquafaba is an easy egg white substitution, particularly for making and baking meringues. Aquafaba's network of starch and protein is able to trap and hold air when vigorously agitated, mimicking the foamy consistency of a whipped egg white. And much like egg whites, a whipped aquafaba's structure can be further stabilized with the addition of sugar and acid like cream of tartar. As a replacement for the heavy whipping cream, use chilled coconut cream whisked together with your choice of sweetener until the mixture is light and fluffy.
Here's a quick word of caution: if you are intending to make a 100% vegan pavlova, don't forget to thoroughly research ingredients you might not expect would contain or use animal-based ingredients in their production. As a startling example in this case, make sure you are using a vegan sugar, one that does not use animal bone char or bone fragments during the refining process.