10 Mistakes To Avoid When Making Homemade Sauerkraut

We may receive a commission on purchases made from links.
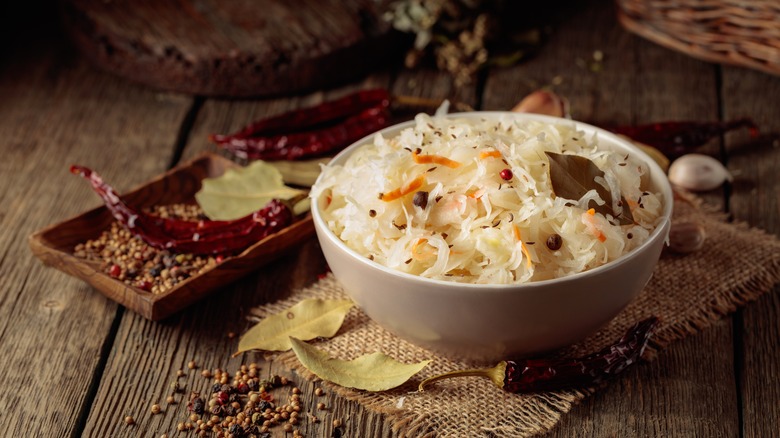
Sauerkraut is a delicious ingredient. It also has a long history, there are a thousand ways to use it, and it's a classic pairing with pork and other meats. Even better: It's super easy to make yourself ... as long as you've got some tips in your back pocket, that is. "Just salt and cabbage, and a few weeks later, you have a tangy, crunchy, probiotic-rich staple that you made yourself," says Marissa Stevens, recipe developer and founder of Pinch and Swirl. "The flavor is brighter than store-bought, and you can control texture and saltiness."
Plus, says Holly Howe of Make Sauerkraut, "You can effortlessly put your gut health on autopilot with one to two forkfuls of probiotic-rich sauerkraut added to one or two meals daily." What's not to like about that?
The downside of sauerkraut is that it's also easy to make rookie mistakes, but once you know what they are, you can avoid them. "The major challenges with making kraut usually narrow down to managing the delicate balance of ingredients, environment, and time required for proper fermentation," explains Ken Tobby, food scientist and founder of Organic Solace. "Since the process greatly depends on beneficial bacteria flourishing in proper conditions, matters such as uneven cabbage shredding, improper salt ratios, or not keeping the cabbage completely submerged in brine can result in undesired flavors, mold, or spoilage."
That's not to say one mistake will ruin your batch of sauerkraut, though. The oodles of friendly bacteria proliferating in your sauerkraut crock can correct for any number of missteps, but there are additional steps you can take to avoid failure. Here are 10 mistakes to avoid today.
1. Fearing the kraut
The science of sauerkraut is fascinating, a dazzling dance between vegetables, salt, naturally occurring bacteria, and the anaerobic environment in which the alchemical transformation takes place. However, that process can be a little frightful, because it seems complicated and therefore easy to mess up. But it's a mistake to let fear keep you from delicious, homemade, gut-nourishing goodness — especially since there's a major flavor and consistency difference between raw versus canned sauerkraut.
"Most of us didn't grow up fermenting our own foods, so the idea of leaving cabbage on the counter for days, or even weeks, can feel risky," Holly Howe explains. "Many people worry they might poison themselves or their family. In reality, fermentation is one of the safest preservation methods we have." Why? Because when you ferment, the good bacteria outcompete the bad ones. If, for instance, you make a salad, all you do is rinse the leaves and hope you've removed the pathogens that might make you really sick ... all while making a super nutrient-rich food. "Fermentation not only prolongs the cabbage's shelf life but also improves its nutritional value, fostering bioavailability of vitamins such as C and K and producing beneficial probiotics," Ken Tobby explains.
Fermentation also kills baddies. "Lactic acid bacteria create an acidic environment where harmful pathogens like E. coli simply cannot survive," Howe says. "What starts as fresh cabbage and salt becomes a self-protecting, probiotic-rich food that keeps spoilage organisms out and good bacteria thriving." For that reason, she says, homemade sauerkraut is actually safer than salad, so you can definitely trust it will be good for your family.
2. Believing you need fancy tools

Fancy tools? Not needed. Sauerkraut, like many fermentation processes from bygone times (think sourdough or kombucha, for example), requires little in the way of specialized equipment. "Fermentation has been done for centuries with whatever people had on hand," Holly Howe says. "In reality, all you need is a quart (liter) jar to get started. For a weight, you can even use a smaller jar filled with water that fits inside the larger one." The only equipment she thinks you should actually have? A scale, such as this Amazon Basics Digital Kitchen Scale with LCD Display. That can help you avoid common ratio mistakes, she says, since the bacteria responsible for the cabbage fermenting work best at a specific concentration of salt.
Overall, though, sauerkraut is straightforward and accessible. "Making your own sauerkraut is incredibly rewarding and a nod to a different culinary time," says Melinda Keckler, recipe developer and founder of Crinkled Cookbook. "For me, it brings me back to my grandma's kitchen. It's an old-fashioned process that proves that simple is best." After all, if Keckler's grandmother could make an awesome kraut in an old-fashioned kitchen, you don't need a bunch of newfangled tools or apps to get it right.
And did we mention it's easy? "The process of making the sauerkraut probably takes around 15 minutes if you are making just a couple of pounds," says Jorge Azevedo, CEO of Fermented Food Holdings, which owns Silver Floss, America's best-selling sauerkraut brand. "Then you have to wait around one week for the fermentation, and you are done."
3. Not using a recipe
Although sauerkraut is fairly straightforward, and many grandparents have been making it since olden times, novices should still use a recipe. "Not using a recipe can interfere with the balance of cabbage, salt, and time required for proper fermentation," Ken Tobby says. It is, therefore, a mistake you should avoid. "With no clear guidelines, one might come up with sauerkraut that is either under-fermented, too salty, or prone to mold."
Fermentation really isn't something you want to eyeball, Marissa Stevens agrees, especially when you're new to the process. "The salt-to-vegetable ratio matters, as does the type of container and how it's sealed," she says. "Using a well-tested recipe removes the guesswork and makes it a lot more likely you'll want to do it again." Indeed, even Polish grandmothers are using a recipe, Jorge Azevedo says. It might not be written down anywhere, he concedes, but they're still using a specific ratio of cabbage to salt, in order to avoid mistakes such as spoilage, under-fermentation, or over-fermentation.
The good news is that, between cookbooks and online sources, there's no shortage of recipes in every shape, color, and ingredient mix. You can even find recipes that have been in the mix for centuries. "I use my grandma's recipe, which was adapted from the Farmer's Almanac," Melinda Keckler says. "She would have her kraut ferment in a large barrel on her back porch. I opt for a food-safe plastic bucket instead, but the process is otherwise the same as hers."
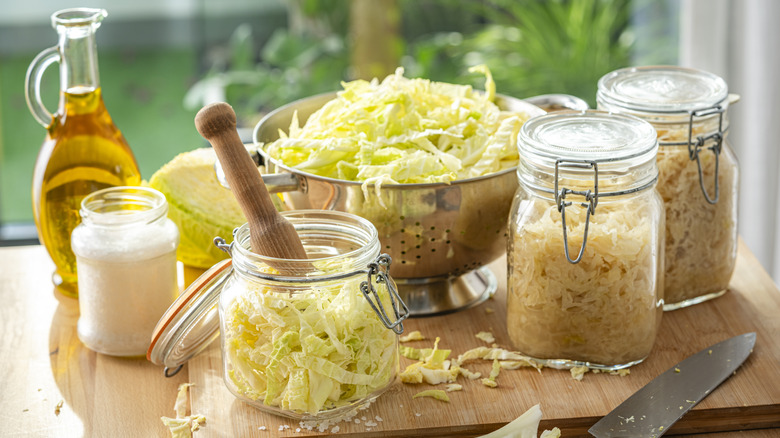
4. Not trimming or shredding the cabbage properly
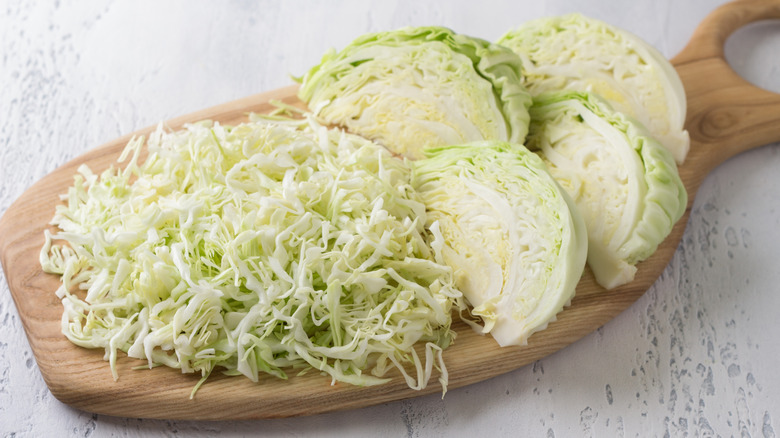
Sauerkraut is a very basic recipe: Shred cabbage, add salt, crush cabbage until it releases juices, push leaves under brine, and weigh them down. That's it. While it seems easy, though, it's a process you've got to get right, and one mistake common to sauerkraut beginners is not shredding the cabbage properly. It really isn't enough to just stuff it in a jar and call it good; you've got to get the consistency of the leaves right. "Large and uneven portions of cabbage do not ferment evenly, resulting in some pieces that are too soft while others remain tough," Ken Tobby explains. "Thin, even shreds expose enough surface area to the bacteria and brine, ensuring a safer, quicker, and tastier fermentation."
You're looking for roughly ⅛ inch (3 mm) thick, Holly Howe says. If you don't have sharp knives, this might be the time to get one. The Amazon Basics 14-Piece High Carbon Stainless Steel Kitchen Knife Set is one online option.
It's also important to get cabbage of good quality, or else you can't rely on a proper fermentation process. "Traditionally, sauerkraut was made with fresh cabbages harvested in late fall, at their peak of flavor and nutrition," Howe says. "Starting with tired, yellowed cabbage that's been sitting around for months is a mistake. It lacks the nutrients, moisture, and beneficial bacteria that fermentation depends on." Plus, if it's all dried out, you can't create enough brine, which comes entirely from the moisture inside the cabbage's leaves ... no water added. You need to get enough hydration so that you can cover your cabbage completely.
5. Using the wrong salt or the wrong amount of salt
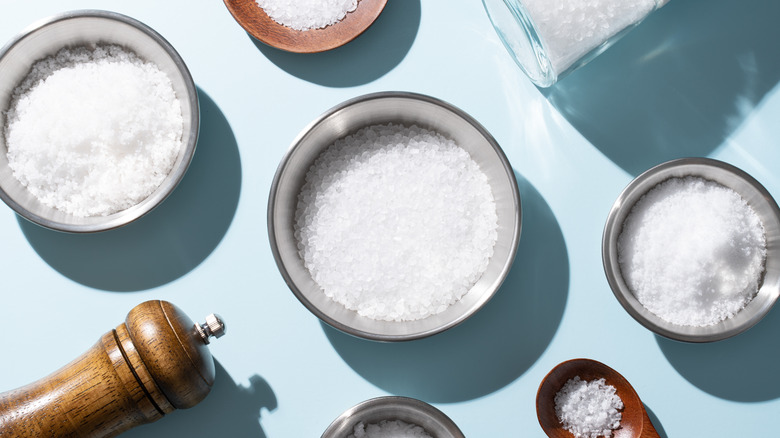
Salt also matters a great deal to sauerkraut, and winging it is a big mistake. Don't just pull your regular iodized salt out of the cupboard and go. "Table salt often has additives that can affect fermentation," Marissa Stevens explains. "I use fine sea salt or kosher salt without anti-caking agents." Redmond Unrefined Mineral Salt and 365 by Whole Foods Market Kosher Sea Salt are two options to consider.
The type of salt isn't the only factor, either; you also need to get the amount right. "Too little and it won't inhibit bad bacteria," Stevens says. Plus, the salt is responsible for pulling water out of cabbage leaves, which is essential for creating brine. "Too much and it slows the whole process or turns your kraut unpleasantly salty. It's not a flavor situation; it's a ratio to follow."
Typically, the ratio is about 1.5% to 2% salt to cabbage by weight. Holly Howe, however, finds that 2% always works for her. As for the math, you can calculate it by setting your scale to grams, weighing your cabbage, then multiplying that number by .02, which will give you the amount of salt you need in grams. Weigh out that amount and add it to your cabbage before crushing the leaves to create brine.
BTW, if you do happen to add too much sodium, there's a surefire way to fix oversalted sauerkraut: just add more cabbage to the mix. If that doesn't work for you, you can also rinse off the sauerkraut after fermenting and before eating it. Just make sure to add less next time.
6. Not packing it tightly enough
Another common mistake when making sauerkraut is to pack it too loosely. "If the cabbage is not packed tightly, it traps some air, which heightens the chance of mold and spoilage," Ken Tobby says. "Tight packing helps to release natural juices; this ensures the cabbage remains submerged in the brine." Also, it is necessary to create the low-oxygen environment that ensures lactic acid bacteria can do their work efficiently. Any cabbage that is exposed to air, outside of the anaerobic environment, will most likely mold.
Why? Because environments with oxygen are very different than those without it. "The good probiotic bacteria work well in the absence of oxygen, while their archenemies, the yeast and mold, like oxygen and need it to thrive," Jorge Azevedo says. "When you let cabbage stick out of the brine, you give the yeast what it wants, and it will dominate that section of the fermentation." On the other hand, yeast will die inside the anaerobic environment of the brine, so if you keep all your cabbage underwater (as it were), this won't happen.
To pack it in well, Melinda Keckler says, make sure to put all the shreds into the jar and push them down, grabbing shreds that stick to the sides of the jar, so they don't poke out. That's a recipe for moldy cabbage and poor results, she says. "My grandma's trick was to put several of the cabbage leaves over the shredded cabbage to create a layer of protection between the fermenting cabbage and the weighted plate that was placed on top," she says.
7. Neglecting the weight or a tight covering
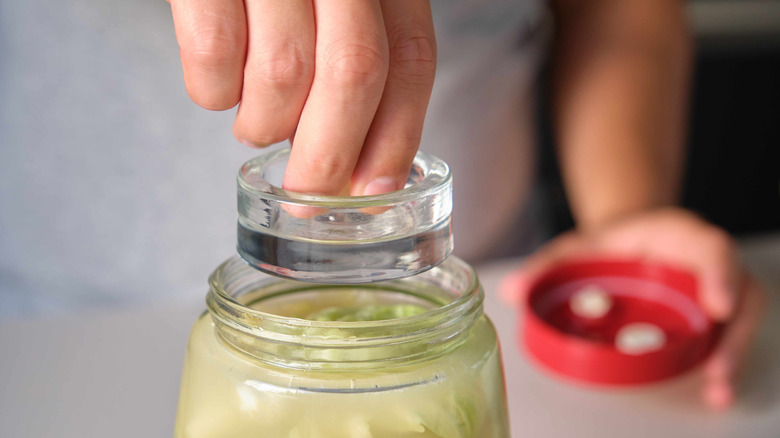
Speaking of weighted plates, how you cover your sauerkraut matters. Don't be casual about this step, even if it seems like the hard part is over. As discussed, failure to keep your cabbage submerged is a huge mistake, because you allow undesirable bacteria to grow. Unfortunately, just because you push your cabbage underneath the brine doesn't mean it will stay there since the shreds will actually float.
Never leave your jar standing open. If you want, you can buy some simple surefire equipment, such as the e-jen Premium Kimchi and Sauerkraut Container or the Masontops Pickle Pipes Airlock Fermentation Lids. However, there are easy, tried-and-true methods that won't cost a thing. "My grandma used a piece of wood with a rock on top to cover and weigh down her cabbage while fermenting," Melinda Keckler says. "While that technique was fine in its day, I opt instead to use a clean plate with a sealed jar filled with water." Whatever kind of weight you choose, make sure to keep the cabbage entirely submerged. If you're worried about it, you can use a clear jar rather than a crock, so you can see what's going on.
Lastly, make sure to keep dust out of the proceedings. You can drape a dishtowel over the top of your setup, as Keckler does. This allows the gas that builds up to escape. If you want to use a tight-fitting lid, that's fine, but make sure to "burp" the sauerkraut every few days to release air, advises Marissa Stevens.
8. Messing with the sauerkraut mid-ferment
Yes, you love your little sauerkraut babies, and you want to make sure they're okay. But much like a cake in the oven, a batch of sauerkraut doesn't want to be messed with. "It's tempting to check and taste constantly, but every time you open the jar or push things around, you introduce oxygen and possibly bacteria," Marissa Stevens explains. "I try to leave it alone for the first five days, then check once a day after that. You'll smell if it's going in the wrong direction."
Depending on the weather and temperature, moreover, it can take longer than a week for the sauerkraut to develop its full flavor and tang, Ken Tobby says. Aside from burping it periodically, try to leave it alone. But don't forget about it, either. "Another mistake we see is simply people forgetting about their fermentation and leaving it there for too long," Jorge Azevedo says. While the fermentation will probably protect the cabbage from spoiling — even after several months on the counter — you probably won't find it to be the crunchy, tangy product for which you're hoping.
9. Keeping the kraut at the wrong temperature

Temperature is critical to the proper formation of many types of food, and sauerkraut is no exception. "The main challenge with making sauerkraut at home is making sure you have the temperature in the right range," Jorge Azevedo says. This is critical to ensuring you wind up with a product that is tasty, crunchy but a bit soft, and good to eat.
Being living organisms, the lactic acid bacteria in your brine are sensitive to both heat and cold. "Too warm a setting can make the sauerkraut ferment faster, losing its crunch," Ken Tobby explains. It may also result in off-flavors and a mushy texture. "On the other hand, too cold an environment can stall the fermentation process. "The perfect temperature should range between 65 and 72 degrees Fahrenheit to achieve a balanced, proper fermentation."
You can usually achieve this by putting your sauerkraut jar or crock in a cool corner of the kitchen, says Marissa Stevens, adding that it's okay to let the kraut take its time. If it's cooler in your house, or during the winter season, it can take up to three weeks ... and that's fine. "I don't rush it," she says. If you're not sure where to find a good spot, the ThermoPro TP50 Digital Indoor Thermometer can help. (Our family has this one, and it has worked wonderfully for years.)
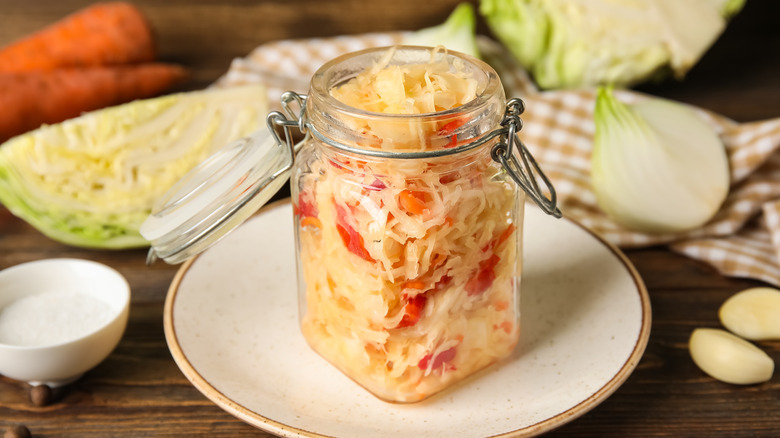
10. Not trying out other vegetables
Last but not least, don't make the mistake of confining your sauerkraut adventures to cabbage alone. Now, there's no need to add extra ingredients to sauerkraut, say the experts. But there are times when you want to ferment cabbage with other flavors — sauerkraut is similar to kimchi, for example, though the latter contains additional seasonings.
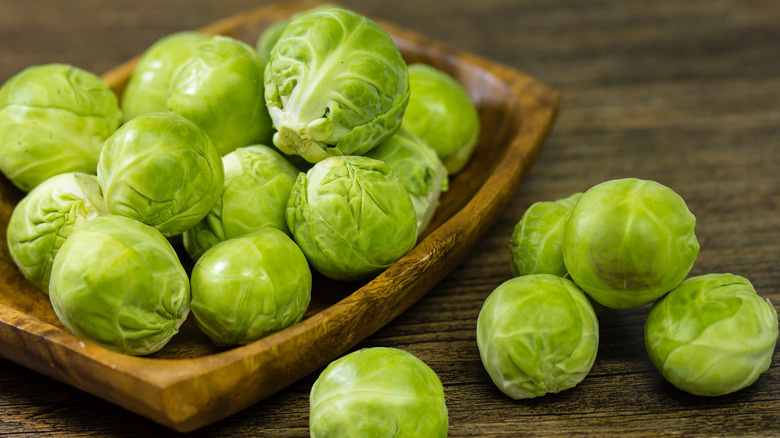
You can also make regular ol' sauerkraut, but with additional veg. "I love cabbage, but it's not the only option," Marissa Stevens says. "Brussels sprouts, carrots, fennel, kohlrabi, and even radishes can all work. Adding variety keeps it interesting and opens up new flavor profiles." That's why she makes Brussels sprout kraut often: "It's got this funky bite that's totally different from the usual."
If you enjoy extra flavorings, you can also add ingredients such as garlic or caraway seeds, Melinda Keckler says. Just make sure you've got your recipe down pat before you start experimenting, she adds, so that you don't make a misstep that ruins your batch. If you want to play it safe, you can always stir them in after fermentation as well. "I prefer to add ingredients to my kraut after fermentation when I'm cooking with it or enjoying it in recipes," Keckler says.