Forget A Gingerbread House, Here Are 14 Tips For Building The Best Charcuterie Chalet
We may receive a commission on purchases made from links.
It's always "gingerbread house this" and "gingerbread house that" — and we're tired of it! If you aren't a big fan of sweets or getting your fingers covered in goopy, melted Dots as you try to create the perfect M&M's driveway leading up to your cookie house — which probably looks like it got hit by a tornado and a hurricane on the same day — you might feel a bit left out of this holiday activity. But we have to give gingerbread houses credit for one thing: They walked so charcuterie chalets could run.
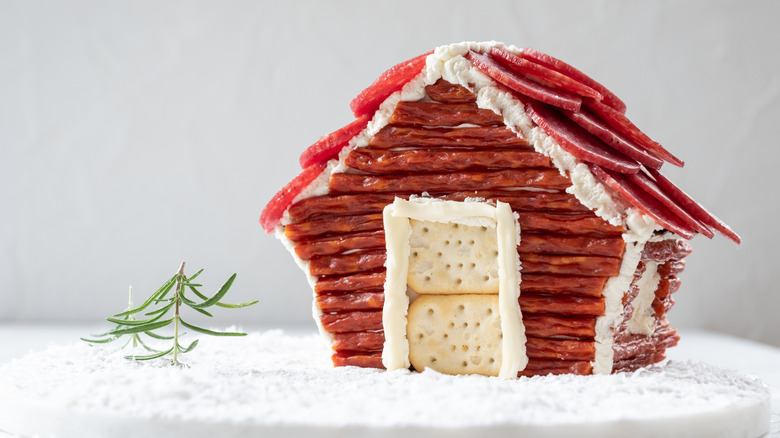
As the name suggests, a charcuterie chalet is the savory version of a gingerbread house. It ditches borderline inedible sheets of ginger cookies for savory crackers, swaps out the sickeningly sweet candies for cheeses, nuts, and meats, and still offers festive cheer — just in a more party-friendly and less cloying package. If you scroll through photos of these elaborately decorated edible houses on social media, you may be in awe of both how elaborate they can be and why anyone would ever go back to making gingerbread houses. Like high-end charcuterie boards, they might seem like a construction better left to the professionals. But with an open mind, a piping bag and offset spatula, a hankering for something salty, and these handy construction tips, you too can turn your charcuterie dreams into a seasonal snacking reality.
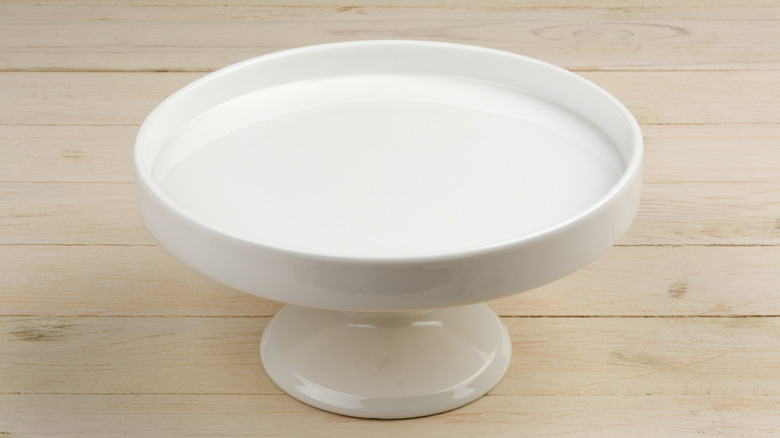
1. Mount it on a turntable to make decorating easy
Ideally, you'll want to display your well-decorated charcuterie chalet at a party or celebration, where all of your guests can fawn over how creative it is (and, by proxy, how creative you are). As such, you'll want to construct your chalet on a surface that is in servable-condition — meaning that you won't have to delicately transfer your precariously built chalet to its final destination.
What's more, we recommend constructing your fromage cottage on a rotating cake stand or turntable so that it's easier to apply your decorations without having to awkwardly position your hand or risk bumping into the structure. Plus, when you go to serve, your guests can rotate the board and pick their desired bite off with ease. There are tons of turntable options available, from flat wooden ones to ones with lipped edges that will prevent your cheese snow from landing all over your countertop.
2. Select a sturdy cracker for your structure
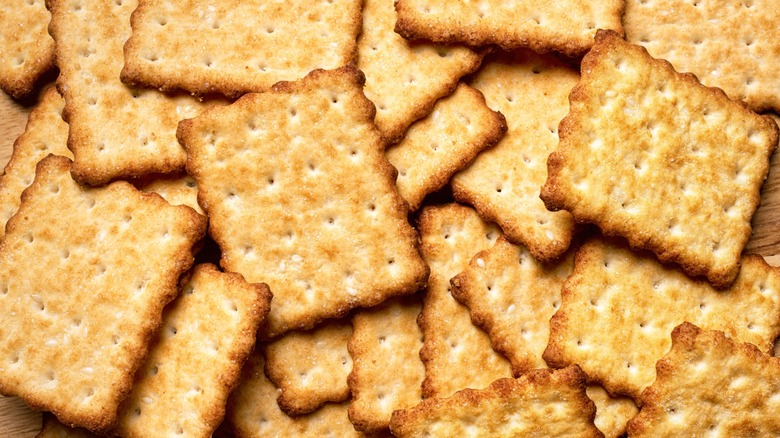
When we first heard of charcuterie chalets, the first question we had to ask was what exactly the construction material was made from. The reason why we use gingerbread for gingerbread houses is because it's dry, resistant to cracking, and, with sturdy enough royal icing and adequate setting time, you can practically make any piece stick to another. As such, the material you select for the exterior of your charcuterie chalet needs to be able to withstand the weight of your decorations — like meat, cheese, and nuts — and be flat enough to decorate. A thick cracker is a good option here.
Like a gingerbread house, people likely won't be eating the walls of your chalet until all of the decorations have been picked off. So you don't have to worry about making it particularly palatable or crispy. In fact, you should shoot for a dough with a similar consistency and thickness to one you'd use for a gingerbread house — around ¼ of an inch thick will suffice. You could also use a gingerbread house base (there are many pre-made cookie kits to choose from), or even just use a non-edible cube (like one made out of foam or wood), and layer on your crackers, meat, and the like to hide it.
3. Use cream cheese as glue
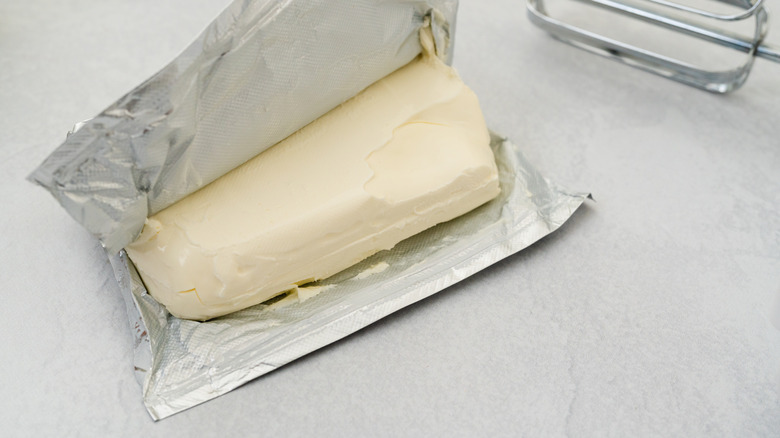
Our second question, following the one about what to use as the external structure of the chalet, was what the heck to use for the glue. Royal icing is the best option for gingerbread houses because it's strong — thanks to the copious amounts of sugar and often meringue powder — but how do you replicate that in a savory form without losing all-important structural integrity?
Full-fat cream cheese is common among charcuterie chalet constructions because it's hefty and easy to spread. You can pop some into a piping bag with a coupler and a tip of choice and get to work. Other full-fat cheeses, like mascarpone, are also excellent options, and some people have even recommended Cheez Whiz.
Another method is to use a melting cheese, like fontina, as the glue for your elements. The issue here is that scalding hot cheese and fingers trying to attach very small pieces of meat and cheese usually don't mix. However, as the cheese cools, it may be a more structurally optimal alternative to cream cheese, which can weep and melt.
4. Choose between crackers or meat for the roof
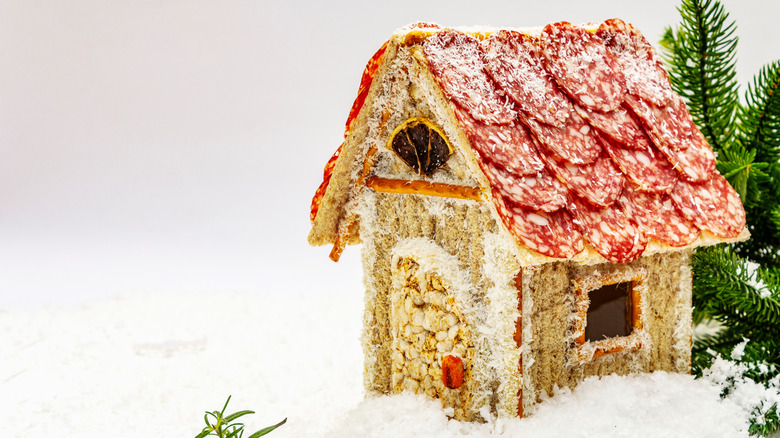
Once you have your four walls and a roof, it's time to start making your chalet somewhere where your little cheese and cracker people would want to visit during the blustery winter months. And that means affixing it with a sturdy and well-decorated roof. Since this is a relatively flat surface, you have tons of opportunities to explore different textures and materials. There are generally two paths that people take: meat or crackers — though you could probably layer sliced cheese as well, especially if you're feeding an audience that eschews fancy bries and Gruyères in favor of Kraft Singles.
We'll touch on the meats first. Now is the time to play with salty, sliced round meats like pepperoni, salami, and soppressata. Layer them in rows, using the cream cheese as the glue, to create a shingle effect. For something more 3-D, you can also fold larger pieces in half. Crackers give you a lot of room to experiment. If you want your roof to look realistic, opt for woven wheat Triscuits; you can even use the black pepper variety for a little extra color. Multi-grain crackers, meanwhile, can give your roof a well-loved appearance, while Ritz crackers can give a slightly more upscale feel (like a ski chalet in Aspen-type feel). Regardless of what you use, be sure to add enough cream cheese or cheese to hold the roofing materials in place.
5. Use cheese to simulate snow
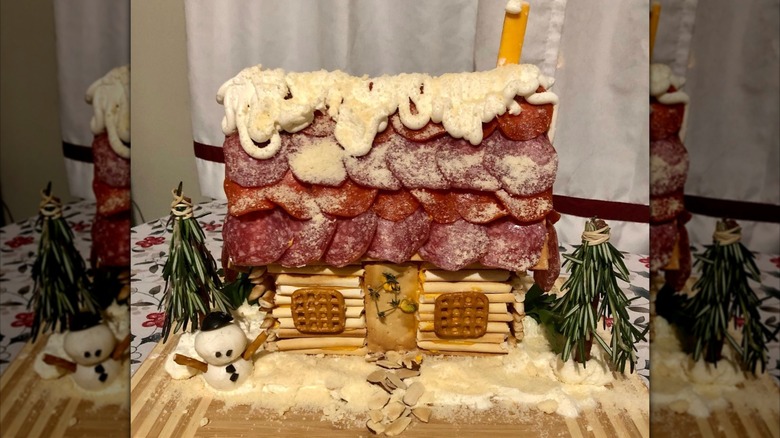
No gingerbread house is complete without a sprinkle of powdered sugar (read: snow), and the same can be said for your charcuterie chalet. However, instead of reaching for the bag of powdered sugar, you're going to need to get creative with your cheeses. You're using cream cheese as glue for your house, meaning you won't be able to see it underneath the layers — for the most part. Instead, you'll want to add a base layer of cream cheese to your board before you start construction, both to add to the wintertime feel and to give your elements something to stick to. Then, you can add a sprinkle of fresh Parmesan for a powdery snow effect. If you have a bit of cream cheese left over from your decorating, you can also whip it or use a piping bag to apply it to the roof of your house.
Cream cheese and Parmesan are far from your only cheese options, though. Construct tiny snowmen using mozzarella balls or stacked pieces of brie. Use black sesame seeds for the eyes and buttons, and reach for broken pretzels to give your snowpeople stick arms. You could even use Babybel cheeses, still in their festive red wax wrappers, to add some color to your scene.
6. Cut up meat sticks for color and texture
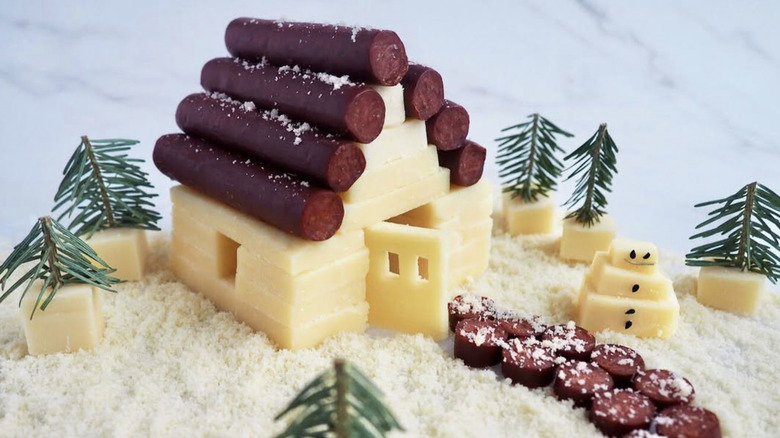
You probably haven't considered using that bag of Slim Jims for construction, but it turns out that they can be one of the most versatile building materials for your savory winter wonderland. They're already log-shaped, so they make great little firewood bundles. Their tubular shape also kind of looks like the outside of a log cabin. Slice the meat sticks so they're the length of your chalet, then stick them to the structure with cream cheese for that rustic cabin effect.
You can also cut up your meat sticks to use them as a pathway leading to your chalet, or as roofing materials. For an extra fun detail, you can use these sticks to create a chimney on your building. Carefully lay a couple of cut pieces in a square shape on your roof and add a dusting of Parmesan. You can also use them to create trunks for rosemary and herb trees.
7. Use other types of crackers to add texture
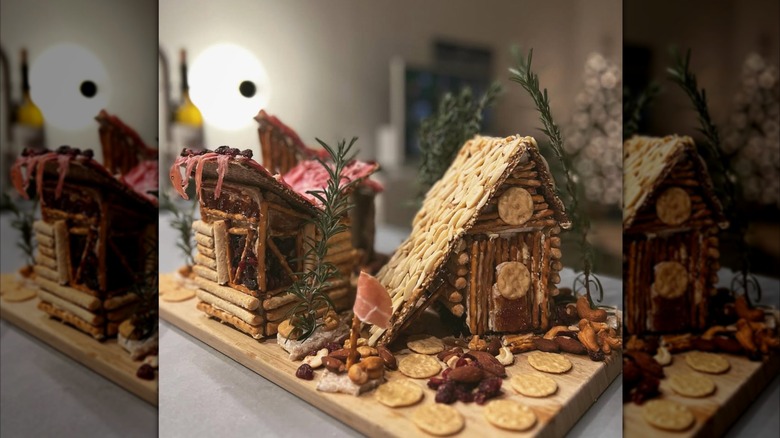
No charcuterie board is complete without crackers, just as no charcuterie chalet is. Crackers are an excellent way to add texture to your scene, and there are more than enough options to choose from. The most important considerations here are shape and sturdiness. Thin, long breadsticks can be broken into smaller pieces and used as fence railing or to make a log cabin-like exterior on your house, while smaller, round crackers — like water crackers, butter crackers, and Saltines — can be used to create realistic roof shingles, pathways, and windows.
Another cracker-adjacent material that you may want to include on your charcuterie chalet are rice cakes. These sturdy puffed cakes can be used for doors and windows, and can be accented with seeds and nuts to create doorknobs or windowpanes.
8. Construct a cheese tree for easy snacking
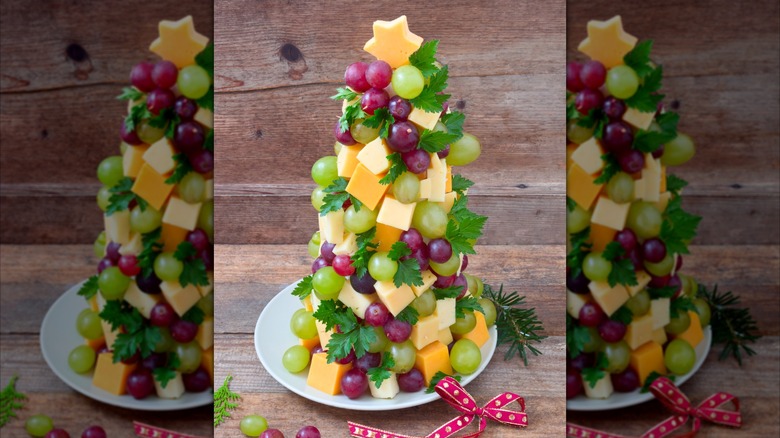
Chalets are typically situated in the woods, so you'll definitely want to give your scene a festive and natural feel by adding a couple of trees. Constructing a small tree out of cheese cubes and grapes is an excellent way to add an easily snackable and ornamental flair to your scene, and guests will definitely appreciate being able to pick off the "greenery" to eat as they admire your chalet. If you're looking to make a tall tree, consider grabbing a cylindrical foam mold and using toothpicks to secure the layers of grapes, olives, fruits, and cheese cubes. You can even fold up some cured meats to add extra color and flavor to your tree.
If you don't want to use meat and cheese, you can also make a gherkin Christmas tree. Similar to the fruit-and-cheese tree, you can use toothpicks to secure the pickles to a foam mold. Cut out little cheese ornaments and a star for the top of your tree to add extra holiday cheer.
9. Don't skimp on the fresh herbs
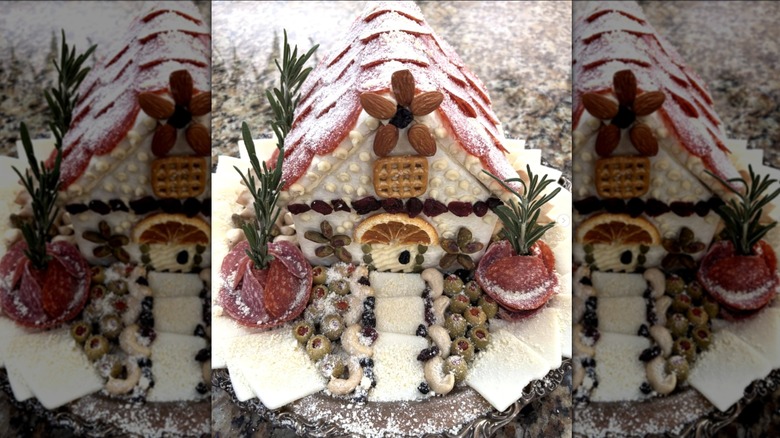
Although your guests won't be snacking on raw sprigs of rosemary, herbs are an excellent way to add some color and decorative greenery to your charcuterie chalet. For one, you can tie the ends of the rosemary together and place them upside down on a pretzel or meat stick to look like small trees. Or you can place them upright on an overturned mushroom cap or a rose-like cured meat arrangement to resemble planters.
If you want to add a more wintery finish to your herbs, consider coating them in a sugar syrup and letting them dry before adding them to your chalet setup. This will add an almost icy coating to the outside of your herbs and make them look as though they just came out of a wintry forest.
10. Use fruits and veggies to add greenery and color
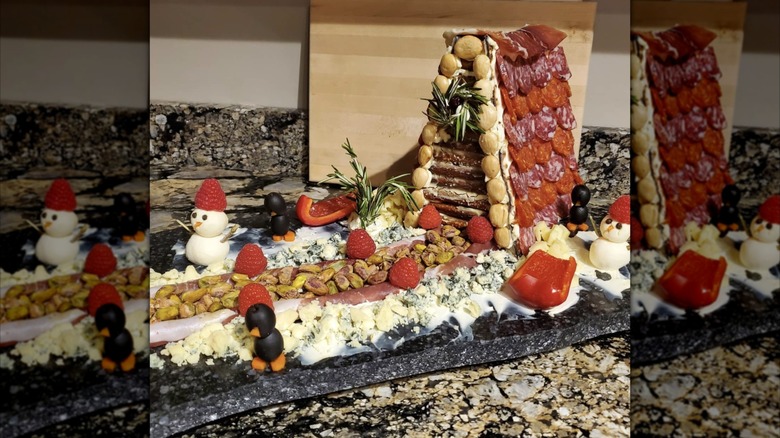
Both fresh and dried fruits deserve a spot on your charcuterie chalet. They can add a pop of color and contrast some of the heavy meats and cheeses on display. Add a dried, halved orange slice above your door to create the look of a stained-glass window, or decorate your garden beds with dried cranberry and raisin gravel. You can also create little penguins out of whole black olives: Use a toothpick to secure them on top of one another, and then add small pieces of carrot to create the feet and the bill. Upside-down raspberries and small balls of cheese on top, meanwhile, make excellent Santa hats for your cheese snowmen and edible figurines.
One of our favorite ideas, though, is to use pieces of red pepper as toboggans. Picture tiny cheese snowmen sledding down the hill at your charcuterie chalet; you can create a slope using crackers or a foam mold.
11. Nuts make excellent pathways and decorations
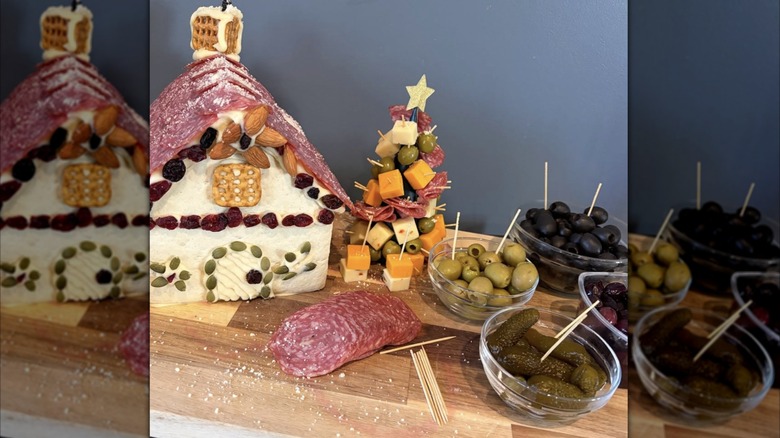
Nuts and seeds are a colorful tool for adding decorative accents to your charcuterie chalet. They come in all different shapes and sizes, including large almonds, plump pepitas, and tiny sesame seeds. You could layer slivered almonds on a gingerbread house roof to create shingles, and the same trick would work for your chalet. Use the nuts to mimic gravel pathways and stone walls around your chalet, or even cover the walls of your building with them to create a stone facade.
Smaller seeds, like white and black sesame, can add detail work to your chalet. They make for great little eyes and buttons on cheese snowmen, and you can use them to add very small details to wreaths or holly bushes. However, it's important to note that nuts and seed allergies are fairly common, so if you plan on serving your charcuterie chalet at a gathering, make sure that you are abiding by the allergen needs of your guests.
12. Make use of pretzels

Rarely do you come across a building material as versatile as pretzels. Not only are they common additions to a charcuterie board — primarily because they have a neutral flavor and are well-liked by both adventurous and pickier eaters alike — but they also come in many shapes. Pretzels are sturdy, so you won't have to worry about them breaking easily.
For one, you can use either the rods or thin sticks to line the outside of your chalet, or to construct fences or firewood logs. You can also grab a bag of the square, grid-lined pretzels to use as windows or for chimneys. Twisted pretzels can also be used for decorative trim around the roof or door of your chalet.
13. Be conscious of food safety

Gingerbread is often made to be played with — not to eat — but can the same be said for a charcuterie chalet? The idea of snacking on a tough piece of dried-out gingerbread covered in gumdrops and frosting may not be as appealing, but a charcuterie chalet covered in meat and cheese might be.
While you can certainly eat a charcuterie chalet, the important thing to remember is that it's made with perishable ingredients, like meat and cheese. If these foods are not properly stored or are left to sit out longer than the USDA recommendation of two hours, you could be sending out an invitation for foodborne pathogens to stay the weekend at your chalet. Putting your chalet in the fridge might seem like the best way to keep things fresh and safe, but many types of cheese are best eaten at room temperature, and putting crackers in the fridge may alter their texture.
Obviously, err on the side of caution and keep your perishable ingredients as chilled as long as possible to stave off food safety concerns, but you might want to just put a "do not eat" note on your chalet just in case (it is art, after all).
14. When in doubt, buy a kit
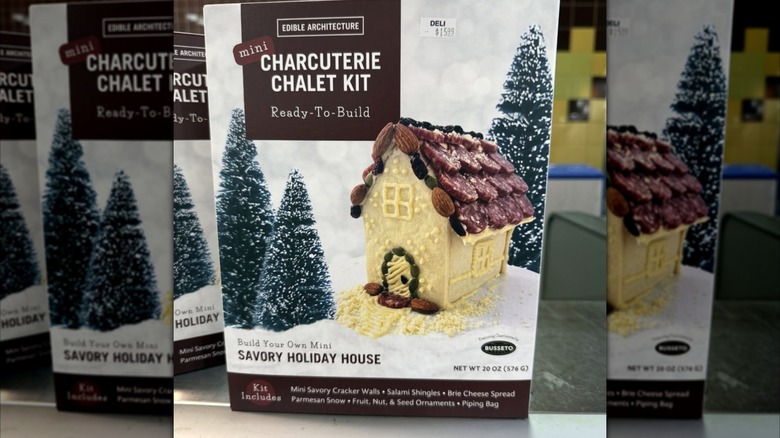
Make no mistake, the cost of your charcuterie chalet can add up fast — even if you pick up all of your charcuterie staples at Costco or Aldi. Not to mention, you also have to nail the perfect texture for your walls; if you don't, the walls of your entire display can literally come crashing down. The lower-risk option, especially if you are a charcuterie chalet newbie, is to buy a kit. After all, cookie decorating kits are a thing, so why wouldn't their savory equivalent be?
You can find charcuterie chalet kits from retailers like Edible Architecture. This kit comes with non-perishable staples, including pre-baked walls and roof pieces, salami, cheeses, and some basic decorating staples like dried fruits and pretzels. The set also comes with an extra set of walls — just in case there's damage during transit. Of course, you could always use these kits as a start; pay a visit to Trader Joe's to pick up some unique nuts to garnish your chalet with, and don't forget to stop by its cheese aisle for even more tasty and structurally sound decoration materials.