Here's How To Create The Perfect Drip Frosting Effect On Your Next Cake With Ease

Drip frosting is one of the handier cake decorating techniques out there; not only does it add a playful splash of color, but it's also easy enough to pull off that you can save ugly store-bought cakes in a matter of minutes. According to creator Allie Hagerty, who writes about coastal-inspired recipes at Seasoned & Salted and about baking at One Bowl Bakery, it all starts with the right kind of frosting.
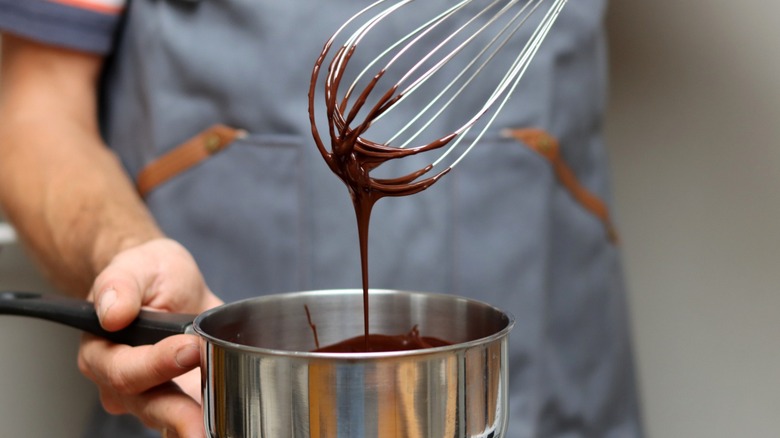
"Ganache made with heavy cream and chocolate is the gold standard. It gives you a smooth, glossy finish and holds its shape when cooled," she shared in an exclusive Q&A with Chowhound. To make a ganache, all you need to do is pour warm cream over evenly chopped chocolate, wait a couple of minutes, and then whisk the mixture until smooth. If you want to elevate its appearance, you can also add butter to your ganache.
When you whisk warm cream into chocolate, you're actually creating an emulsion from the combination of fats in the chocolate and water in the cream, among other elements. As it cools, the fat in the mixture starts to crystallize as cocoa solids absorb the water, giving the ganache a stable structure that retains its shape after pouring — essentially, the perfect consistency for drip frosting. Keep this in mind if you're thinking of substituting cream with milk for your ganache, especially since the latter is lower in fat content.
How to make a drip-ready ganache
It's important to know that the higher the proportion of chocolate to cream, the thicker your ganache will be because of the stability provided by both the cocoa butter and cocoa solids in your chocolate. The type of chocolate matters, too — dark chocolate is composed of up to 90% cocoa solids, for example, so it gives you a firmer result. For a dark chocolate ganache, you can get a good drip by starting with a 1:1 ratio between chocolate and heavy cream, and then adding a tablespoon or two of additional cream just so the emulsion doesn't get too firm. Milk chocolate ganache does well with a straight 1:1 ratio, while white chocolate ganache needs a 3:1 ratio because it doesn't contain any cocoa solids.
Allie Hagerty suggested testing one drip on the back of the cake to check you've got the right consistency. "If it runs too quickly down the side of the cake, it's too thin. If it clumps at the top and doesn't move, it's too thick," she said. If either happens, you can adjust by adding a little warm cream to loosen the ganache, or chill it for a few minutes to firm it up.
If you want to use bold, bright colors, Hagerty recommended going with white chocolate ganache as your base, and then adding a tiny amount of gel food coloring. When it comes to the differences between gel and liquid food coloring for ganache, gel always wins out. Water-based liquid food coloring will require you to use a lot of it, and adding that much water could compromise the stability of your ganache.
Tips for achieving the perfect drip
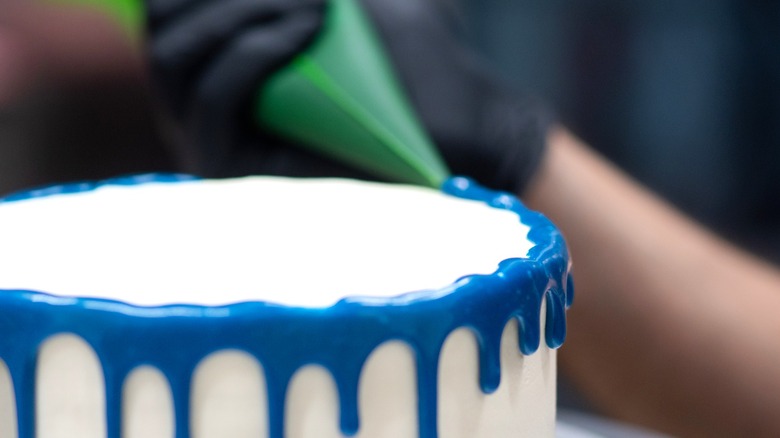
Once you've got your ganache exactly how you want it, achieving the drip aesthetic is a matter of technique and temperature. While some bakers recommend using a spoon or piping bag to apply the ganache, Allie Hagerty's favorite tool is a squeeze bottle. "You get total control and can move around the top edge of the cake evenly," she explained. "A spoon works too, but it's a little messier. If you're going for drama and precision, the squeeze bottle wins."
When it comes to temperature, Hagerty said that one of the biggest mistakes people make is dripping their ganache onto a warm cake. The heat won't allow the frosting to set soon enough, and your drips will end up sliding off the cake. For best results, you'll want to use a chilled cake and ganache that's just slightly warm.
"Another common mistake is using ganache that's too thin. It pools at the bottom," she added. You'll want it to have the texture of maple syrup when you start applying it to your cake. To help achieve the right consistency, she explained, the ganache needs to be at a temperature that isn't too hot to set, but also isn't so cold that it won't drip down enough. Once you've mastered the art of drip cakes, it's time to get creative — try combining these techniques with other unique cake decorating ideas and see what fun you can come up with!