How To Laminate Puff Pastry
Laminating puff pastry is a seasoned skill that separates the novice home baker from the professionally trained pastry chef. It's undoubtedly one of the most tedious tasks in baking, requiring a certain level of skill and knowledge. As a professional pastry chef with over a decade of experience in the culinary industry, I've spent quite a bit of time dealing with laminated puff pastry. My first experience with it was when I was staging at a bakery in Los Angeles and tasked with the job of making sausage rolls. My first immediate thought was to start defrosting the premade frozen puff pastry dough, which quickly went away when I noticed the dough laminator sitting in the corner. Being quite a rookie pastry chef at the time, the thought of having to laminate puff pastry dough all by myself set a shiver down my spine.
Cemented in my mind, I believed that only pros could make a proper laminated dough; however, after my first try, all those worries washed away. Looking back almost 10 years into my career as a chef, I've realized that if you've got an eye for precision, have a bit of patience, and of course, love all things pastry, you could easily tackle this project at home. If you've ever bitten into a palmier cookie or sausage roll and wondered, "How does one even create those tiny, delicate layers?", then use this article as your step-by-step guide on how to laminate puff pastry dough.
What is laminated puff pastry?
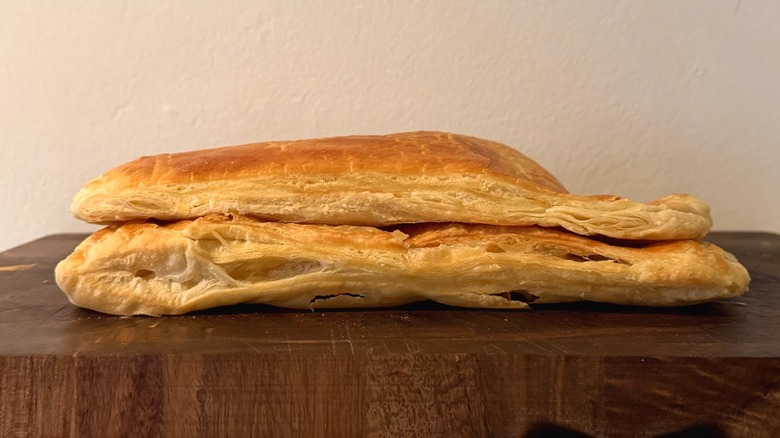
For those of you who don't know, lamination is a baking technique in which cold butter, also known as the "beurrage" or "butter block", is folded repeatedly into the base dough called the "détrempé". This layering process can create upwards of 100 to over 1,200 layers, depending on the number of folds. Lamination is used across the pastry world to create hundreds of distinct, alternating layers of butter and flour in pastries like croissants, danishes, and, of course, puff pastry. However, puff pastry is in its own unique category since, unlike croissants, it doesn't contain any yeast or sourdough starter — it solely gets its rise through steam. If it couldn't get any simpler, the dough is made from a mixture of all-purpose flour, salt, and cold water — that's it!
You might be wondering, "How does it even rise in the oven if it doesn't have yeast, let alone baking powder?" Well, when puff pastry is baked in the oven, the water in the butter quickly evaporates and turns into steam, which helps push these layers apart, creating a dramatic rise (often triple the size of its original height), forcing those layers apart and producing the dramatic rise and a flaky interior with a beautiful, crisp golden brown exterior.
What ingredients will you need?
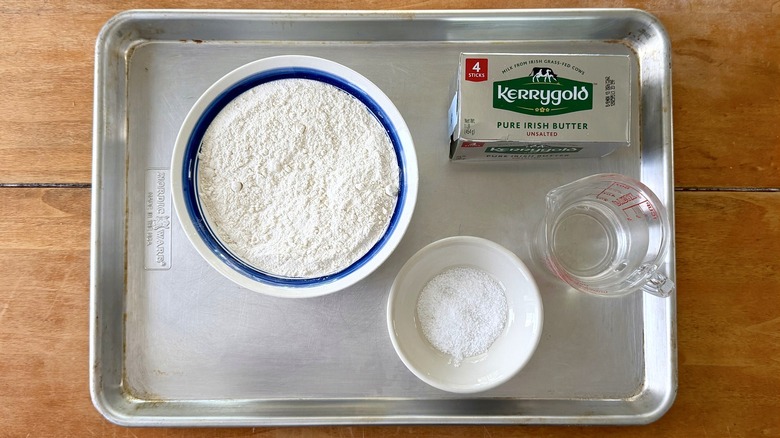
Ingredients:
-
2 ½ cups (300 grams) all-purpose flour
-
1 teaspoon (3 grams) kosher sea salt
-
½ cup (120 milliliters) cold water
-
1 cup (227 grams) cold, high-quality European unsalted butter
What tools will you need?
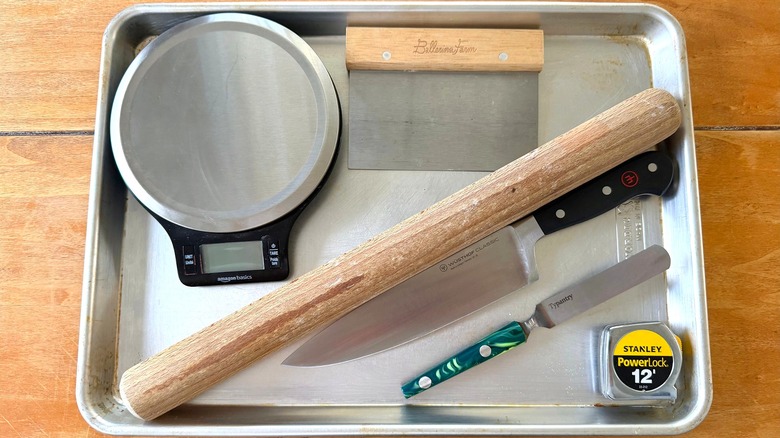
Tools:
-
Rolling pin
-
Bench scraper
-
Plastic wrap
-
Parchment paper
-
Ruler
-
Chef's knife
-
Offset spatula
-
Baking sheet
-
Oven
Make the détrempé (base dough)
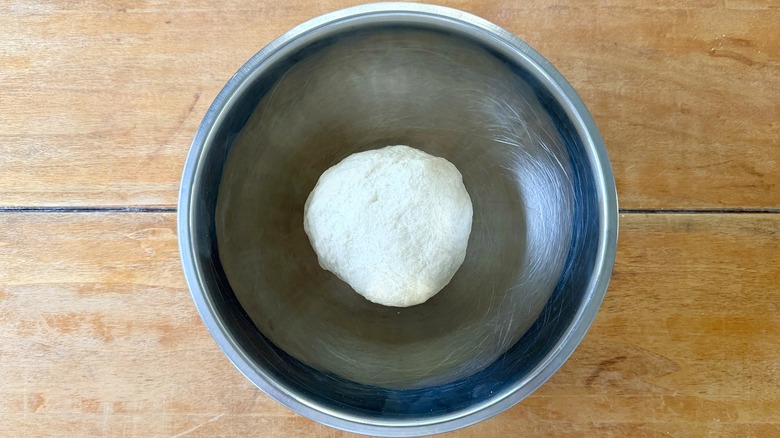
The détrempé is a French baking term used to describe the initial base dough, typically composed of flour, salt, water, milk, and sometimes a small amount of butter, depending on what you're making. This dough is used to encase the beurrage for laminated pastries, basically acting like an envelope that holds the fat during the lamination process.
To start, line a sheet pan with parchment paper and dust lightly with flour, then set aside. To make the détrempé, combine the flour and salt in a large bowl and whisk to combine. Slowly drizzle in the cold water and combine with a rubber spatula. Knead the dough until everything is thoroughly incorporated and roll into a smooth ball. Wrap it in plastic wrap, then let it rest in the fridge for at least 1 hour. After it's finished resting, roll the dough into a square (approximately 10 × 10 inches). Once the dough is rolled out, transfer it to a lined sheet pan, wrap it in plastic wrap, and refrigerate it for about 30 minutes.
Prepare the beurrage (butter block)
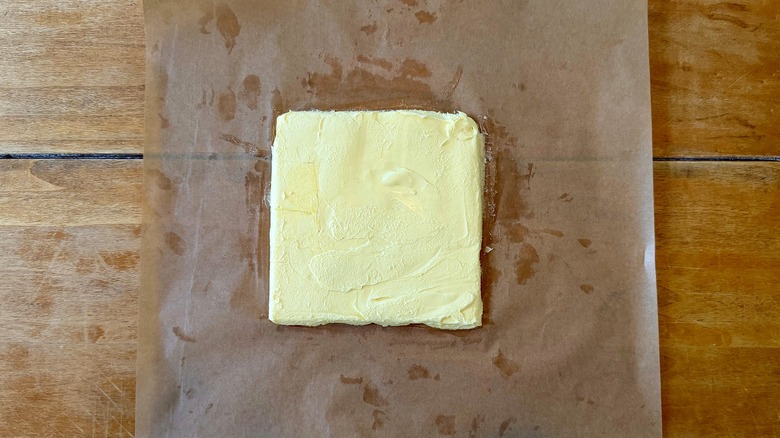
First things first, it's extremely important to use high-quality European butter like Kerrygold or Président when making a laminated dough since it has a lower water content compared to American butter, which gives it better pliability, making it easier to fold into the dough. To begin, while the dough is resting in the fridge, place the cold sliced salted butter pieces in a pile on a sheet of parchment paper and place another sheet on top. Use a wooden rolling pin, beat the butter gently, in a small up and down motion to combine each piece of butter, flattening them into a single, uniform layer. To make the butter pliable, you must use cold butter, or else you might end up with a soft, sticky buttery mess.
Once a rough square is formed, remove the top sheet of parchment paper and use a spoon or offset spatula to gently spread the butter into a 4-inch uniform square with ¼ inch thickens. Make sure to straighten out the edges and create sharp corners — this might take a bit of time to get the perfect 4-inch butter block, so if your butter starts to get too soft or melt, place it back in the fridge for about 15 minutes to firm up. Once finished, tightly wrap the butter block completely in parchment paper and let it rest in the fridge until it's completely firm and cold, about 30 minutes.
Encase the butter in the dough
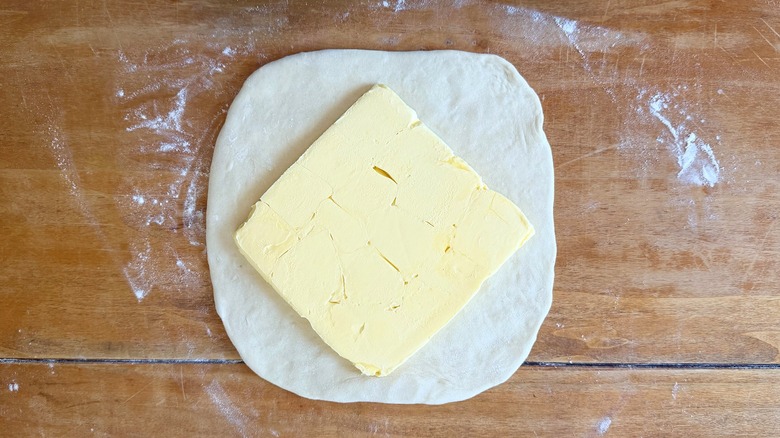
Remove the détrempé from the fridge and place it on a lightly floured surface. Dust off any remaining bits of flour on the top surface of the dough, then unwrap the butter block from the parchment paper and place it directly in the center of the détrempé so that the butter block's corners point toward the four sides of the dough. Next, fold each of the four flaps of the dough inward one at a time over the butter block like an envelope, completely encasing it so no pieces of butter are showing.
Each flap of dough should easily meet in the center and overlap in the center and just slightly along the sides without much force. Gently press the seams firmly to seal the edges so the butter block is completely encased with the dough. It's important that there are no gaps, cracks, holes, or thin spots that expose the butter block since the last thing you want is butter leaking out while you're folding.
Complete the first fold
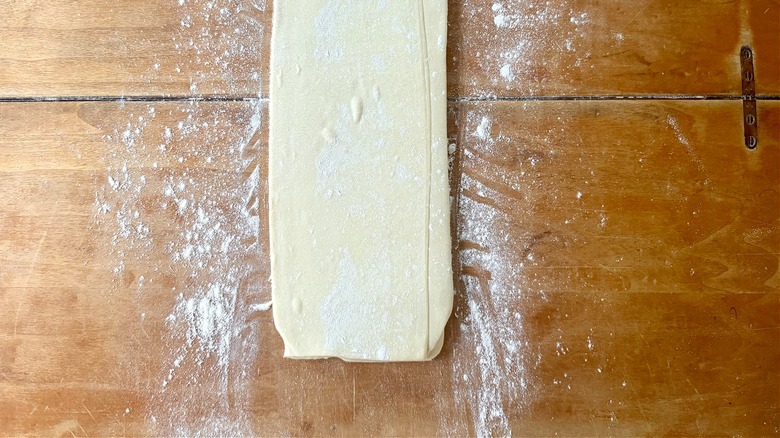
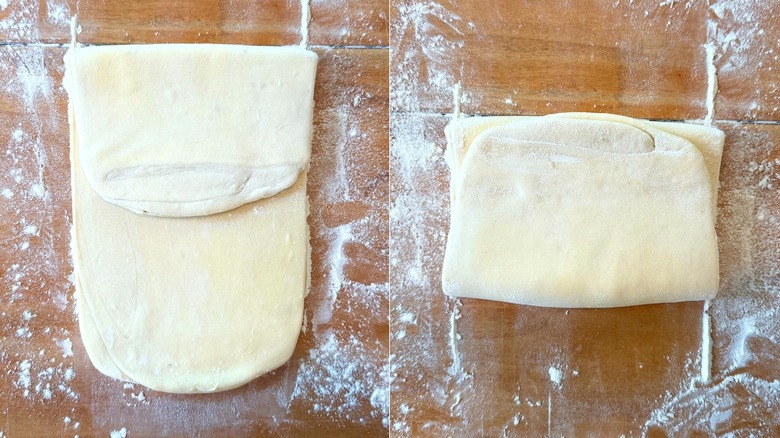
Once the butter block is completely sealed and encased in dough, you've created the "pâton" — a French baking term used to describe a package of dough when the détrempe and beurrage are combined and are ready to be rolled and folded. To start, dust more flour underneath and on the top of the dough. To keep the butter block completely intact within the pâton, use the rolling pin to lightly beat the dough to flatten and lengthen it slightly.
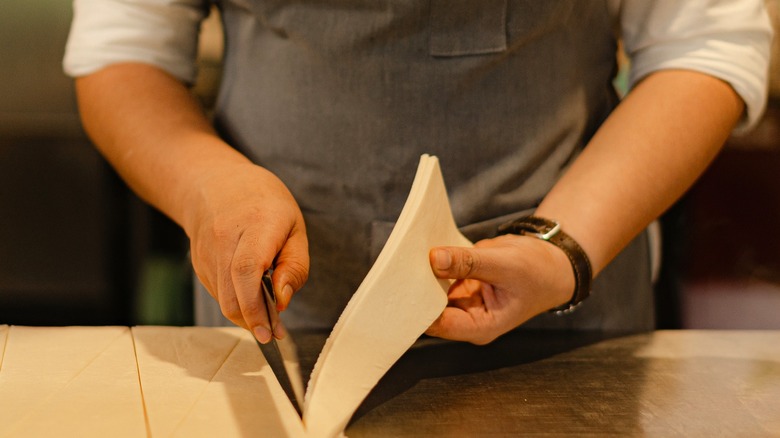
Once it's rolled out about half its original size, start to roll the pâton into a rectangle (approximately 14 × 6 inches). Gently roll out the dough, working the dough away from yourself to stretch it out into a rectangle. It's important to try and keep the edges straight and corners sharp — if you have a bit of extra dough that's noticeably hanging over the encased butter block, slice it off to keep the perfect rectangle shape.
Once it's rolled into a rectangle, you can begin the folding process. Start with the side closest to you and fold the bottom third towards the center, then fold the top third over it like a letter, then rotate 90 degrees. Before folding the top third over, make sure to dust off any excess flour. This completes your first "turn" of the lamination. Repeat, and complete your second turn.
Rest the dough in the refrigerator
After you've completed your second turn, gently place the folded dough onto a parchment-lined sheet pan and wrap the entire sheet pan in plastic wrap, encasing the dough. Refrigerate it for at least 30 minutes. This allows the butter to firm up once again, so it stays intact and prevents it from becoming soft or even worse, melted into your dough. It also allows the gluten molecules in the dough to relax, making the dough easier to roll out, so you don't have to put too much elbow grease into it.
Whenever you're rolling out basically any type of dough, you want it to feel relaxed and easily extended rather than tough and resistant. So if you skip this step, the gluten molecules in the dough will remain tense and pressured, making it extremely difficult to roll it out without ripping or tearing into your dough — exposing the butter block and ultimately ruining your puff pastry before you even put it in the oven.
Repeat the folding process
After your dough has rested for at least 30 minutes in the fridge, you can complete the third turn. Unwrap the chilled dough and place it on a lightly floured surface, so that the letter flap is facing up and the edge of the flat is on your right. Roll out the dough again into the same long, straight-edged rectangle as you did before (approximately 14 × 6 inches). Be sure to dust underneath the dough as needed to prevent it from sticking to your work surface. If the dough seems too stiff to roll out, gently beat the dough to flatten and lengthen it slightly as you did before, then continue with the rolling process.
Once it's fully rolled out, fold it into thirds again following the same method and rotate it 90 degrees, then refrigerate it for at least 30 minutes. Repeat this process an additional three times, from rolling to rectangle, folding it into a letter, then resting in the fridge after every 2 turns until you've created 6 single turns in total.
Roll out and use your puff pastry
After its final rest for at least 1 hour, you can now roll out your dough on a lightly floured surface to your desired thickness. Depending on the project, it's best to roll out laminated puff pastry to around ⅛ to ¼ inch thick. If you do it any thinner than the butter layer, you won't be able to create the steam needed to lift the pastry and create those flaky layers. If the puff pastry is too thick when baked, it can become quite heavy and dense. ⅛ to ¼ inch is the perfect middle ground because it ensures that the butter layer is thin enough to create steam to lift it, yet thick enough to maintain adequate separation, preventing the dough from melting together and creating thick, dense dough.
It's important to keep in mind that whatever you make with your puff pastry will require a different thickness. For delicate items like pastry cups, you should aim to roll them closer to ⅛ of an inch thick. If you're making a pastry that requires a sturdy structural support, like tarte tatin, then roll it out closer to ¼ of an inch thick. Bake the puff pastry at 400 degrees Fahrenheit for about 15 to 20 minutes until it's golden brown and puffed. Don't forget to brush it with an egg wash to get that golden brown color.
How to store laminated puff pastry
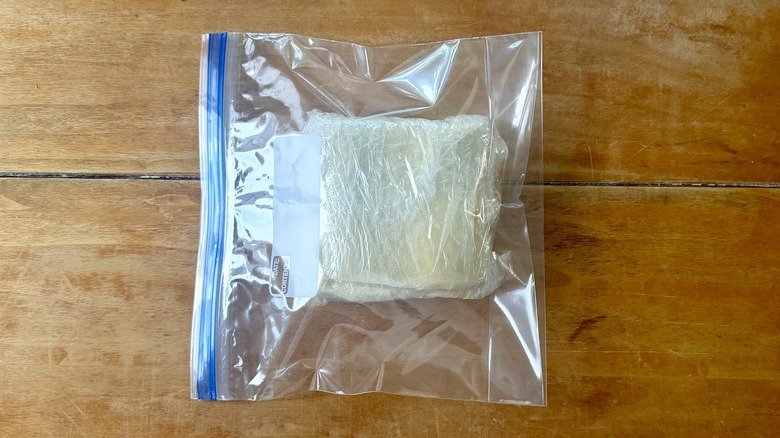
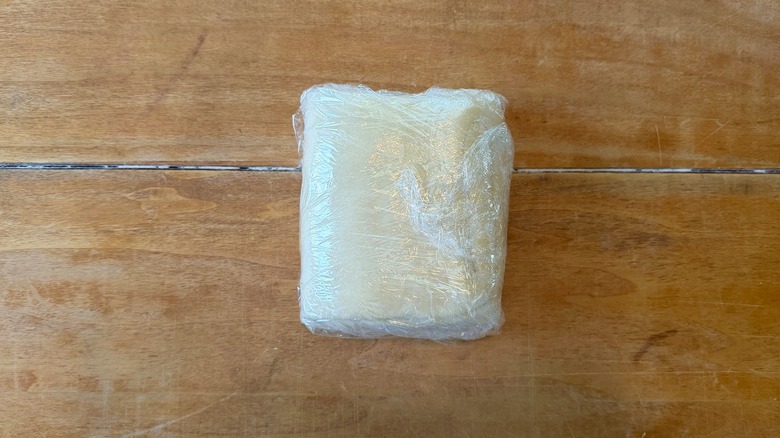
Freshly made laminated puff pastry is best used the same day it's made, but if that's not possible, you can store unbaked laminated puff pastry by wrapping it tightly with plastic wrap to prevent it from drying out, then store it in the refrigerator for 2 to 3 days. You can also freeze it for up to 3 months, just make sure to double wrap it in plastic wrap and place it in a food-safe freezer bag to prevent freezer burn.
To defrost it, you can leave it in the refrigerator overnight until it's completely thawed out. If the dough seems too cold or stiff when rolling it out, leave it uncovered at room temperature for 10-15 minutes to bring it to temperature. Any leftover trimming or scraps can be saved to make homemade crackers, mini fruit-filled turnovers, or even tiny savory cheese biscuits.
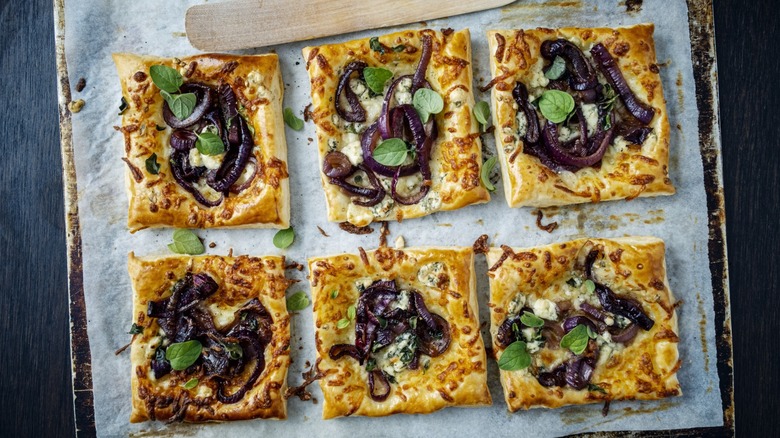
Recipes to make with puff pastry

Now that you've put in the work, it's time to put that puff pastry to use! You can use your laminated puff pastry to make all kinds of delicious treats from homemade croissants and danishes to pigs in a blanket and sausage rolls. If you want to go down the sweet route, try making a homemade fruit jam to make turnovers, or take it up a notch and use it to create a beautiful tarte tatin. You can even make delicious cookies like palmiers or cinnamon sugar twists.
Don't have much of a sweet tooth? No problem! Use your homemade puff pastry to elevate savory dishes like chicken pot pie, French onion soup, or beef Wellington. You can even use it to make a deep-dish quiche, veggie tart, or even a homemade pizza. However you decide to use it, give yourself a pat on the back because you've just tackled one of the hardest baking projects you can do as a home baker!