Make Roast Chicken Skin Crackle With This 3-Day Technique
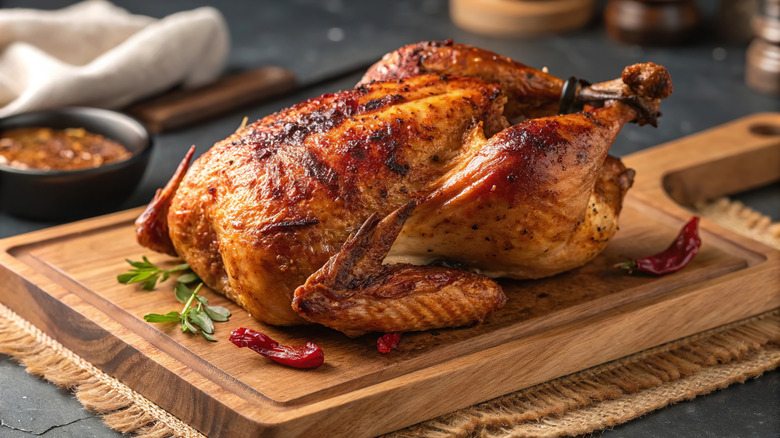
There is such a thing as a perfect roast chicken: Tender, still-moist breast meat. Dark meat that falls off the bone, packed with salty, savory flavor. And of course, there's the skin — golden brown, shatteringly crisp, fat rendered perfectly, and encrusted with salty, peppery goodness. But let's be real — most roast chickens don't land anywhere near this mythical perfection. For such a simple, time-honored classic, it's all too easy to get wrong.
The biggest challenge is the skin itself. It contains moisture and fat, both of which can prevent the skin from rendering and crisping up when roasted. Many cooks focus on oven temperature or mid-roast basting to improve results, but how you treat your chicken before cooking it matters even more.
That's why one of the most effective upgrades isn't about fancy techniques at all: It's about drying the bird out in the fridge for multiple days. Resting the chicken uncovered allows the skin to dehydrate slowly and evenly, giving you the best chance at that crackling, chip-like finish once it roasts. All you really need is salt, water, and time (and thyme, if you fancy it!), but it's the hours spent drying that transform the final texture.
The drying process is crucial

For this technique to work, it's crucial to dry your chicken out. And we don't just mean patting it dry with a paper towel. In order to get the crispiest, most consistent chicken skin possible, we mean really, truly dry it. Give your chicken a rest for several hours — or even better, a full day — uncovered in the fridge. It's important to let the air circulate around the whole bird here, so you don't end up with any soggy patches, so make sure to rest it on a wire rack with a tray underneath. The cold air of the fridge will help to effectively dehydrate the skin, so that it renders and crisps up beautifully in the oven, without the meat overcooking.
You might be worried that leaving your chicken out would cause the meat itself to dehydrate too, and go tough — but fear not. A recommended part of this process is brining, which will have ensured that the chicken stays juicy and tender. It's the same principle that you'd apply to dry aging beef, just on a shorter timescale.
For an even more consistent cook, consider spatchcocking your chicken. This involves removing the backbone and breaking the breastbone so that your chicken lays out flat — meaning that the dark meat will cook through before the more delicate breast meat is overdone. With a bit of clever butchery, you can remove the ribcage entirely — but for home cooks, the best method is to take a pair of sturdy kitchen scissors and make two cuts all the way through the bird, one on either side of the spine.
A wet brine is a great way to tenderize your bird
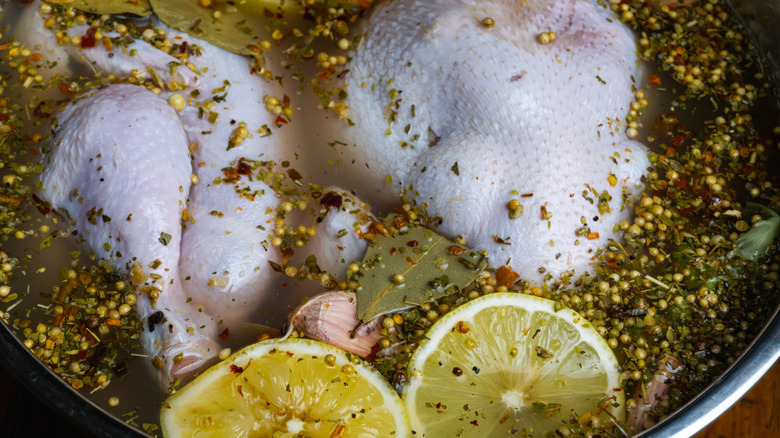
If you're an enthusiastic home cook, brining will likely be a familiar technique to you — but just in case it isn't, let's break it down. Essentially, brining involves submerging a protein in a solution of salt and water (and other aromatics, if you want) in order to tenderize it and intensify its flavor before cooking. Salt dissolves the muscle proteins in the meat, preventing them from contracting violently when exposed to heat — which is what causes your meat to go all tough and dry when cooked at a high temperature.
Even a few hours of brining will go a long way when it comes to improving your roast chicken, but an overnight bath will deliver the best results. Thomas Keller is famous for making one of the best roast chickens in the business — he brines his bird for anywhere between eight to 12 hours. While a wet brine moistens and tenderizes the meat of your chicken, allowing it to dry post-brine is the secret to pulling all of that extra moisture out of the skin, leaving you with a juicy yet crispy result.
As far as butchery is concerned, remove the wishbone to make carving easier — but that's all there is to it! A 5% brine (i.e. 5% of the weight of the water you use in salt) and lots of lovely aromatics like thyme, whole peppercorns, and bay, and you're ready to go. For the absolute best results, never skip drying your bird in the fridge — while you'll have to wait a little longer to tuck into that chicken, the final product will be more than worth it.